#2044911 - 05/12/10 01:28 AM
 Heinous Control arm install guide
|

User
Poobah
Registered: 10/09/00
Posts: 9455
Loc: So Cal
|
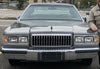
Background:The Heinous upper and lower billet control arms were made to offer an option for the Panther community and increase both looks and performance. The arms are CNC machined from 6061 T-6 aircraft grade aluminum and have milled pockets and holes for the lightest possible weight. They are anodized black with the chamfers cut to show the aluminum and they feature polyurethane bushings from Energy Suspension. The arms improve handling in acceleration, cornering and braking and fit all 98+ Crown Vics, Grand Marquis, Town Cars and Marauders. A quote from Ubervic on Crownvic.net : "Far better control, feel and responsiveness of chassis dynamics under cornering, braking and, most of all, acceleration---the greater control to suspension dynamics makes the vehicle feel about 200-300 lbs lighter on acceleration, or almost like it's gained at LEAST 30 crank hp/torque. Car wants to LEAP forward on launch and under deep throttle anytime. Braking is more confident and controllable. Cornering is drama-free and the vehicle rotates with greater speed/ease. Straight-line road feel is improved; feels like suspension is tighter, as if spring rate (front & rear) has been increased but with no negative side effects." Pic before:  Jack and jack stand placement:  Pics comparing upper arm:   Pics comparing lower arm:   Pics of upper arm installed, lower arm going in:   Installed driver side:  Installed passenger side:  Pic of the hydraulic spreader I used for alignment purposes:  Tools needed: Tools needed: - Floor jack and two jack stands
- Tire iron/sockets to remove lugnuts
- 15mm and 18mm socket
- 21mm wrench
- Ratchet or impact/air ratchet
- Prybar or hydraulic spreader (like seen HERE )
- Torque wrench
- Loctite
- Energy Suspension grease (Optional)
Procedure: - Jack up the rear of the car at the rear differential, making sure the front tires are blocked.
- Put the jack stands under the frame right in front of the lower control arm mount. Allow the rear end to extend almost all the way and keep the jack under the center of the pumpkin for support
- Remove wheels and tires from both sides.
- I removed one arm at a time to make it easier to position the arms.
- I started with the upper arm. Take the 18mm socket and either use a ratchet, or if you have air tools, an impact/air ratchet to remove the front bolt. Use a 15mm socket for the rear bolt.
- Install the Heinous upper arm making sure the larger bolt opening is in the front. You can use Energy Suspension (ENS) grease to lube the outside of the bushings if you wish.
- Use silicone or the ENS grease to stick the washers on the front bushing. I stuck the washer closest to the frame and put the arm in the pocket. Stick the bolt in to make sure the washer is aligned. Stick the other washer in and put the bolt in. Do not tighten it yet.
- Position the rear arm into the pocket. If needed, use a prybar or hydraulic spreader to align the bolt hole. Tighten the bolts, but you�ll torque them later
- Use the 18mm socket and ratchet of choice to remove the lower front bolt and for the rear bolt use an 18mm socket with 21mm wrench on the nut. Put the front of the arm into the pocket and put the bolt in. Put the rear of the arm into the pocket and again, if need be, use a prybar or hydraulic spreader to align the bolt hole. Tighten the bolts now, but you�ll torque them later.
- Repeat steps 5-9 for the opposite side.
- Torque all bolts. Specs are as follows: Upper arm-to-frame bolt and flag nut 150 Nm (111 ft. lbs.) Upper arm-to-axle bolt and flag nut 93 Nm (69 ft. lbs.) Lower arm-to-frame bolt and flag nut 150 Nm (111 ft. lbs.) Lower arm-to-axle nut and bolt 150 Nm (111 ft. lbs.) (There is an argument on how to properly torque the arms. I torqued the bolts in the air with the jackstand under the center pumpkin so it was not completely hanging. Others argue the vehicle should be torqued on the ground or close to normal ride height. Choose what you feel is best.)
- Put the wheels back on, remove the jack stands, lower the car and torque the lugnuts
- Enjoy!
CONTACT CHRIS WITH ANY OTHER QUESTIONS OR IF INTERESTED IN THIS PRODUCT!
|
|
Top
|
|
|
|
|
#2044993 - 05/12/10 08:07 AM
Re: Heinous Control arm install guide
[Re: RocketCouch]
|
4v swap + Full Rauder Everything
Over the Hill

Registered: 06/24/04
Posts: 4128
Loc: New York
|
Thanks Chris - The UPS Shipment says "Out for Delivery" sweet!
_________________________
03 300A Ported uppper/lower | SW Longtubes | Borla ProXS | Magnaflow muffled X pipe | Circle D Pro series TC | J-Mod | MSD Cops | Kinsler | 255lph | Dyno tune | 3.73s | Trick flow cover | MMC shaft | 13.8 @ 99 N/A
08 MGM LS 17k! (13K in Aug-16) New daily driver | Loaded Black/Black leather, heated | remote start | factory security glass |Air Ride | Wood leather wheel | 2.73 RAR! | Borla Catback dual kit with H pipe
|
|
Top
|
|
|
|
|
#2045420 - 05/12/10 05:21 PM
Re: Heinous Control arm install guide
[Re: Bull]
|
Over the Hill
Registered: 03/16/07
Posts: 1215
Loc: Point of no return
|
|
|
Top
|
|
|
|
|
#2046723 - 05/14/10 03:17 PM
Re: Heinous Control arm install guide
[Re: ubervic]
|
Climber

Registered: 09/12/08
Posts: 536
Loc: MN
|
To add on to the install summary:
To install the washers I used Gorilla Impact Resistant Super Glue and attached both washers on either side of the bushing, then greased them up and slid the arm in there. I used manpower and a rubber mallet on top of that to get the arm lined up but it went much quicker on the second side after figuring out how to properly do it on the first side. That stuff will make those washers stay in place!
I would also like to say thanks to Chris for these arms! They are worth every penny!
_________________________
Black 2003 CVPI w/50k miles and too many mods to fit in my sig!
|
|
Top
|
|
|
|
|
#2048979 - 05/17/10 10:12 PM
Re: Heinous Control arm install guide
[Re: Codyy]
|
Cynical Jackass
Poobah

Registered: 05/19/09
Posts: 5427
Loc: Somewhere in the CRC
|
The washer's only go on the upper control arms where they connect to the frame, one on each side of the bushing. None where the uppers connect to the axle and none on the lower arms. I do not believe locktite is necessary but couldn't hurt, I didn't use any.
Matt
_________________________
2003 Crown Victoria ( AKA Car Craft Crown Vic )  , Trick Flow 38CC top end kit, 04 Navigator water pump, Circle D multi disk 3500-3700 stall converter, Full SW exhaust, MM Airbox and MAF, ADTR zip tube, 78mm BBK Plenum and TB, Transgo Stage 2 shift kit, 3.73 with track lok, Naake coilover suspension, Henious control arms, Metco watts link, ARP watts link stud, Addco sway bars, Powerslot rotors with Hawk HPS pads, BH1976 headlight relay harness, Procar sportsman pro race seat's, 17" steel rims widened to 9.0 with Nitto 555's in 285/40/17 tire for the rear, Tuned by Mo's Speed Shop in Dallas Georgia....more mods coming soon. 1997 Mercury Grand Marquis HPP. Full PI engine swap, Stock PI torque converter, 04 Navigator water pump, 3.27 with trac lok 
|
|
Top
|
|
|
|
|
#2049477 - 05/18/10 03:34 PM
Re: Heinous Control arm install guide
[Re: RocketCouch]
|
User
Poobah
Registered: 10/09/00
Posts: 9455
Loc: So Cal
|
You can use the prybar or hydraulic spreader like I mentioned above to get the tension off the bolt.
|
|
Top
|
|
|
|
|
#2049677 - 05/18/10 08:27 PM
Re: Heinous Control arm install guide
[Re: Codyy]
|
User
Poobah
Registered: 10/09/00
Posts: 9455
Loc: So Cal
|
Oh, got it... Use a hammer and screw driver and drive it out!
|
|
Top
|
|
|
|
|
#2049707 - 05/18/10 08:56 PM
Re: Heinous Control arm install guide
[Re: RocketCouch]
|
Fearless Leader
Poobah

Registered: 03/01/09
Posts: 5747
Loc: Up North Eh
|
I have a thread in suspension forums in case as well. Unfortunately and to no avail I tried all afternoon to do that. Apparently the metal bushing of the old arm is somehow bound to the bolt. When I turn the bolt, the metal part of the bushing turns as well inside of the rubber of the old arm. Here are some pics I took to explain: Here's pictures to help summarize the problem (also a pic of the completed side): http://img197.imageshack.us/g/otherview.jpg/Red line is where I propose to cut. I don't know what else to do now besides cut the old bolt off.
_________________________

|
|
Top
|
|
|
|
|
|
2 registered (LordAeneas, Moby_Vic),
71
Guests and
11
Spiders online. |
|
Key:
Admin,
Global Mod,
Mod
|
|
Member Since: 08/03/07
Posts: 114
|
|
|


 Previous Topic
 Index
Index
 Your Privacy Choices