This is a guide to changing the Transmission Fluid and filter on a 97 Crown Vic. I've also included the procedure on how to change the Fuel Filter. I decided to change them because I had been getting mild Torque Converter shudder between 3-4 shifts. Also I don't know when if was ever changed before. As for the Fuel Filter, it's not that old but whatever helps my MPG, I'm all for it. I do have the O2 sensors included in my supplies but I never got around to installing them this time.
I used the guide posted by JohnG
Which can be found here as a basis for this write up and I wanted to take pictures and post them because I know as a novice mechanic myself no matter how detailed the instructions are, I always love when pictures are included.

I hope JohnG doesn't mind if I simply combine his steps into my writeup, as I think it will only improve on the awesome job he did already.
First of all here are the supplies needed:
* Jack and jack stands
* Shop rags or towels (I went through at least 2 rolls of Shop Towels)
* Set of wrenches (std & metric)
* 10mm socket wrench for pan bolts (1/4� drive preferred)
* 7/16� socket (for converter drain)
* Long ratchet 1/2� drive with a 3/4� (18mm) socket.
* 14 qts. ATF (Mercon V is required)
* One drain pan, capacity at least 12 qts.
* Two lengths of small hose, 5/16�OD x 4� ea. (I use clear plastic) (3/8" may also work)
* One gallon windshield wash or milk jug (used, need not be clean)
* One can of brake cleaner
* New filter kit (if replacing filter - optional for most ppl Motorcraft FT-105)
Included in my supplies that are not part of the transmission service are the oil oil filter, fuel filter, and the 02 sensors. But while you have the car up, you may as well change those as well.

Removing the old fluid
1. First disconnect BOTH cooler lines at the radiator pre�98, or at the cooler �98 and newer.
2. Push one of the small hoses onto each line at the fitting, make sure they go on about 1�.
3. Now run both hoses into the empty jug, and set it inside the right inner fender on top of the upper control arm. You are ready to start the engine and use the transmission to pump out the old fluid, and flush the system.
4. Be CAREFUL, you will most likely get more than one gallon (4 qts.) of fluid out doing this, so when the jug is just over half full, shut the engine off and empty the jug, then put it back and finish flushing. Pay attention to which hose the fluid comes out of so you can purge all the old fluid out when the job is nearly done.
Here are the 2 lines you must disconnect from the radiator.
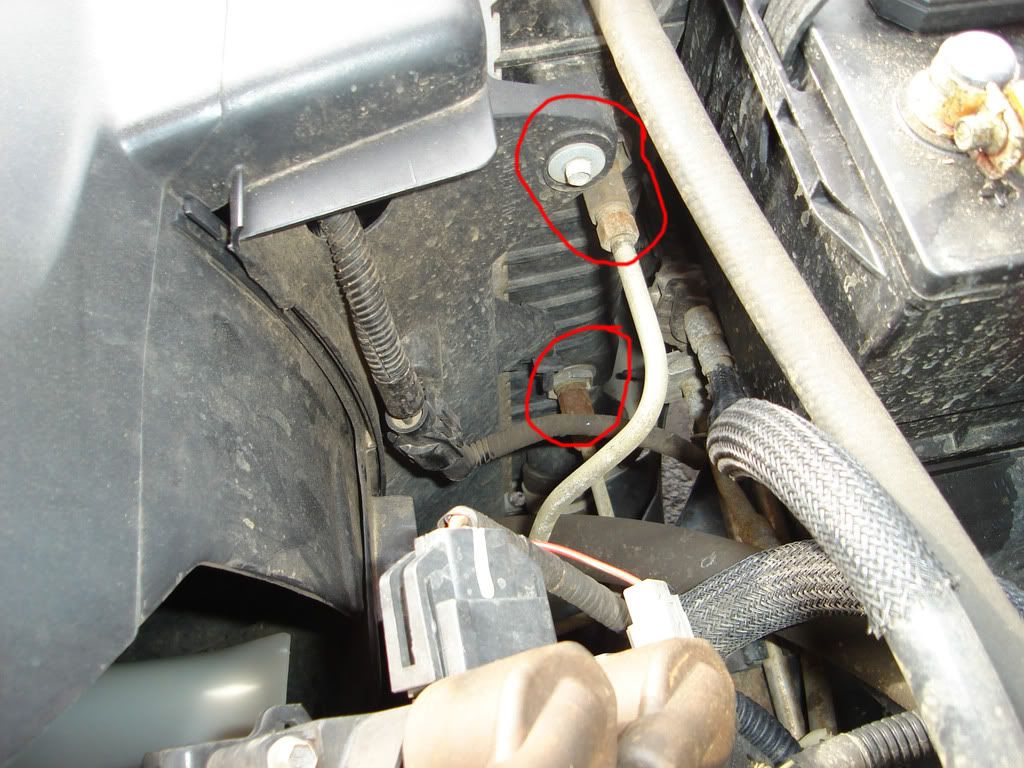
I had to remove the battery to get to the lower line and yes there is enough room to swing a wrench down there

Here are the tubes hooked up and how the whole setup should look

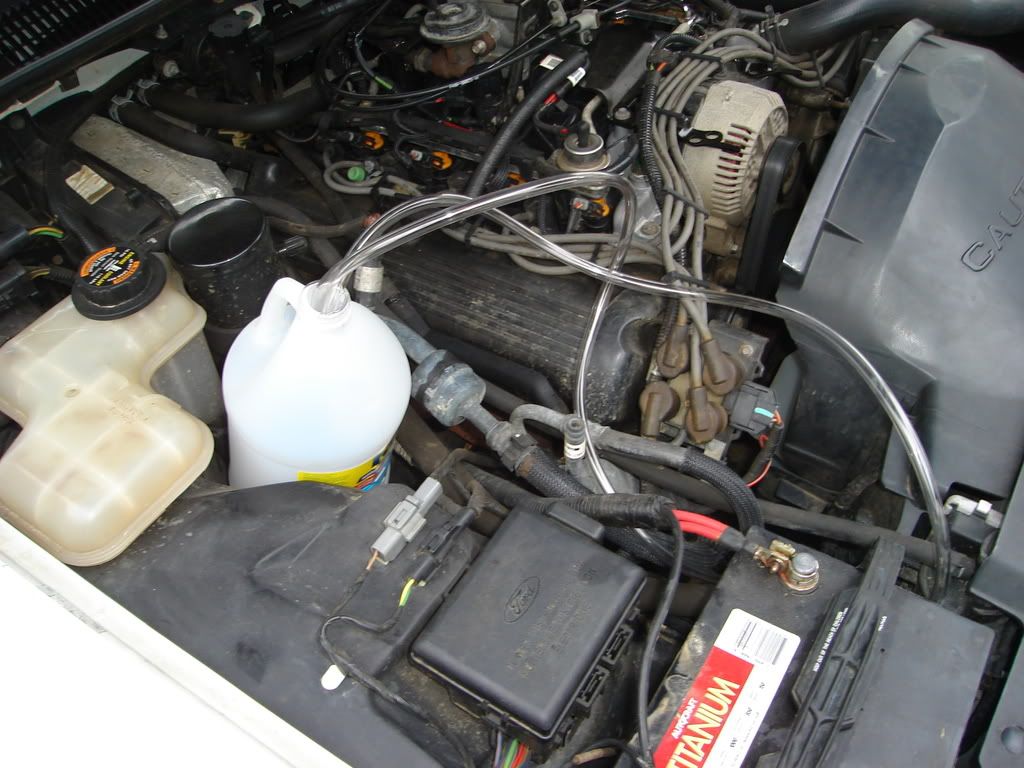
Now for it in action, The lower hose is where the fluid is going to come from. It comes out with some force so make sure the hose is a deep in the jug.

You can see why mine needed to be changed a lot better here.
Draining the converter (for pre ~01 MY torque convertors, newer models lack drain plug) * Now that the pan is empty, it is a perfect time to drain the converter, and service the filter (if you are doing that).
1. Set the parking brake, chock the rear wheels front and back sides, jack up the car under the large front cross-member, and place jack-stands securely under the vehicle on the frame.
2. To drain the converter, remove the 2� rubber plug from the bottom of the bell housing, turn the engine over using a socket on the crankshaft bolt, turn the engine in the NORMAL DIRECTION OF ROTATION ONLY (as if you were tightening the crank bolt) to avoid damage to the timing chain tensioners.
* When you can see the small plug in the access hole, use your 7/16� socket to loosen the plug and allow the converter to drain. It will hold between 6 and 8 qts., and may take up to an hour to drain completely, so be prepared.
3. Disconnect the battery, unplug the PCM from the harness, or remove the PCM "KAM" fuse while the converter is draining to re-set the adaptive shift strategies in the PCM for the transmission. This is VERY IMPORTANT !
4. While the converter is draining, you can remove the pan bolts and pan from the transmission and service the filter. There will be a small quantity of ATF left in the pan, so use caution, but it will not be full.
* Change the filter (make sure old filter o-ring/seal comes out with the old filter - use a seal pick or similar if required to remove), and clean the pan throughly. You can place the pan in your dishwasher after wiping it out to make sure it is clean, but make sure there are no women around to see this! The factory pan gasket is a �rubber� covered metal core gasket, and if still there, reusable unless torn or chunks are missing.
* After installing the new filter (make darn sure the old �o�-ring came out of the transmission with the old filter), you are ready to re-install the pan and gasket. Set the gasket on the pan lip, and using two bolts set the pan into position and hold it in place using one on either side at opposite corners, finger tight! Now loosely install the remaining pan bolts into the transmission. Once all bolts are installed, working in a cris-cross pattern, torque the bolts to 9-11 ft-lbs. (snug).
5. Reinstall the torque converter drain plug, and torque to 9-11 ft-lbs. (snug). You are ready to set the vehicle back onto the ground at this point.
In the 97 CVLX the larger 30 amp green fuse seen here is the PCM fuse you have to remove

Here you see the Bell housing and the 2" rubber plug

And the Plug removed, revealing the Torque Converter. In my case I was lucky and the drain plug was right there so I didn't have to turn the crankshaft bolt.

Here is the drain plug in the Torque Converter

And once you remove it

Just let the Converter drain for a while.

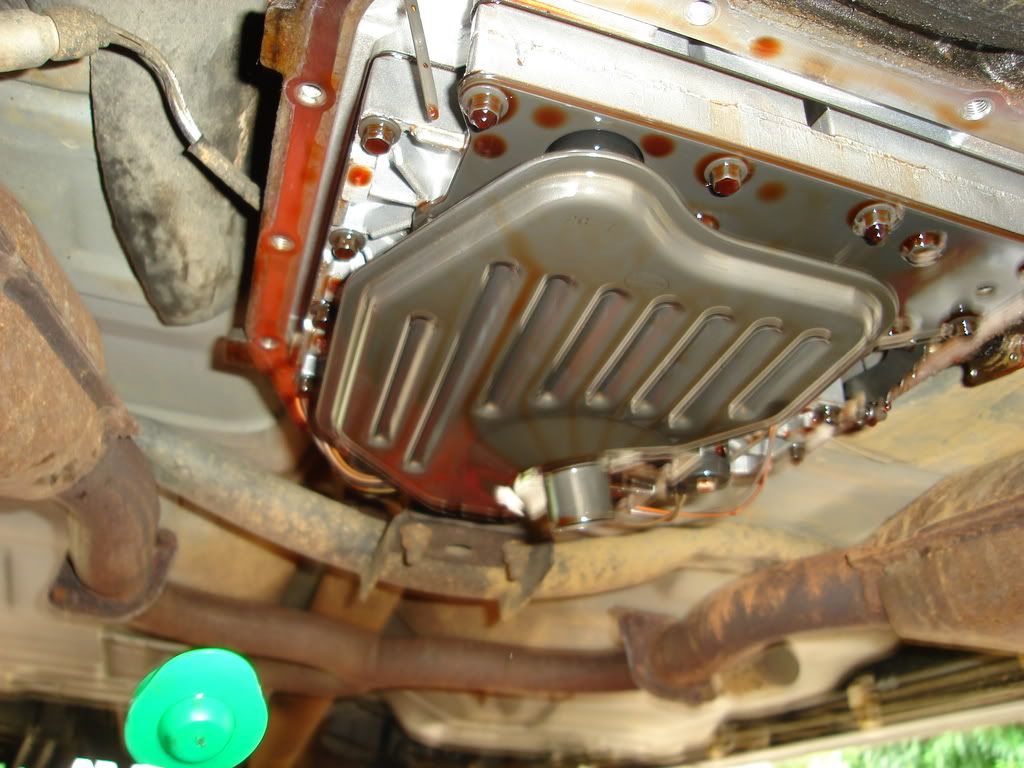
Now onto the pan and filter. I started by removing all the bolts except for the four corners, then I held the pan in place while I removed the last 4

As you can see there won't be much fluid left in there so don't worry about much spilling

You can see the infamous plug that is a result of the assembly process here, I kept it as a souvenir

You have to clean the pan of all the old fluid and anything else that might be in there and you also want to check the magnet for any signs of above-normal wear.

Since mine was filthy it took me a while to clean the gasket but I got it nice and clean.

Before reinstalling the pan bolts and magnet I cleaned them in the brake cleaner to get rid of what I simply called "Muck"

The Filter was easy to change, just pull straight down and it comes out(making sure that the old O-ring did too) and Intalling the new one is just as simple.
Old
New

Before reinstalling the pan, make sure to clean the gasket surface and use the same 4 corner method with the bolts as you did when dropping it. Button everything up and reinstall the Torque converter plug and move on to the next steps.
Refill and flush * After the vehicle is back onto the ground, once again dump out the old ATF from the jug under the hood. Add approximatly 4 qts. of ATF to the transmission through the fill tube. Start the engine, and allow it to run until the jug is about half full, you have now flushed the system. It is possible to also flush the cooler, but that requires a small section of cooler line be attached to the cooler outlet, and the �to cooler� line be re-attached to the cooler and most people do not have the �special� small line available, and you just did a far better service than 99% of all vehicles will ever get anyway. (Note, due to the thermostatic bypass valve found in 98+ panther transmission coolers flushing the cooler cannot be done)
* Reconnect both steel cooler lines to the cooler assembly and tighten the tube nuts securely (snug), DO NOT overtighten! It is FAR better to add torque to the nut if it seeps, than to strip it out and have to have it towed for repairs, yes?
* To complete the refill process, start the engine and allow it to idle as you add an additional 6 qts of ATF through the fill tube. Operate the selector through each range, and return it to park and set the parking brake.
o When all 10 qts (4+6) are in, and with the engine running at idle still, check the level and add until it appears on the bottom end of the band.
o Now take it out for a drive.
o When you get back, verify that the fluid is in the �HOT� operating range, add as required.
I didn't take any pictures of the refill process because I simply forgot but it's pretty straight forward and the only advice I can give is to remember to plug the PCM fuse back in or you'll be cranking the car wondering why it won't start.
 The Fuel Filter
I did this while I was waiting for the Torque Converter to drain so I had the vehicle up on jack stands but the first time I did this I was on the ground so the lift isn't needed.
Supplies:
A flathead screwdriver
Fuel Filter
Soda Can with the top cut off(Or other suitable container for gas)
Rags

Start by prying the old clips off with the screwdriver, then use that same screwdriver to loosen the clamp.

My clips came off this time intact, but they are no more than a year old, the first time I snapped them because they were brittle. Some filters come with new clips (like mine) but I know on some newer models (the newest you need a special to to remove the Fuel Filter) the filters don't come with clips so salvaging them is important.
YOU WILL GET FUEL ON YOU!!!
So be careful! Once the clips are removed and you pull off the fuel lines fuel will pour and or drip out. I would be a good idea to discharge the fuel system by hitting the Fuel Pump cut-off switch in the trunk and cranking the engine a bit, however for me , I had drained the engine oil as well as the transmission at this point so I didn't.
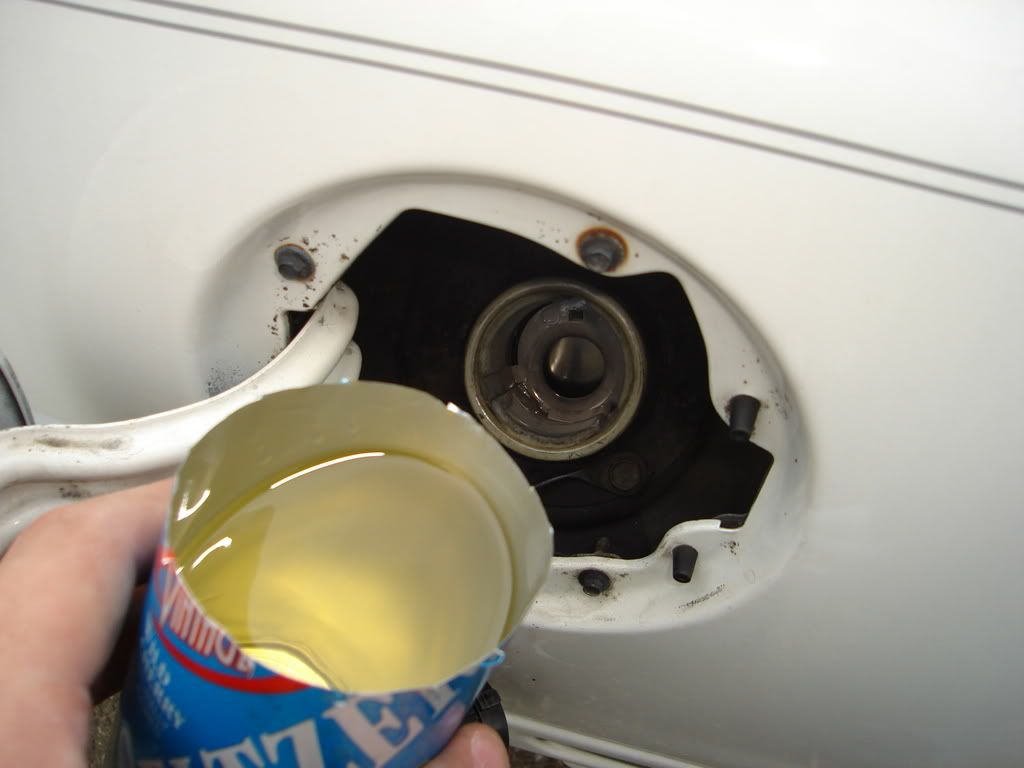
This is where the can comes in handy, use it to catch the fuel as it spills out of the filter.

I got about this much gas

And I spilled a little bit. It may not be much but at $4 I'd much rather have that in my tank than on the pavement.
Put the New filter in, tighten the clamp, put the fuel lines back on and push the new or old clips back into place. Don't forget to add your saved fuel to the tank
Special Thanks to JohnG and all those who answered my questions about this job. If anything above is inaccurate or needs clarification please post it ans I will gladly change it.


 Previous Topic
 Index
Index
 Your Privacy Choices