I've never done a writeup on anything, but figured that maybe I would take a stab at chronicling the steps that went into getting my car running. I think I was short on pictures, unfortunately.
Not sure how to get one added to the BOK, or if you guys even think it'd be a good idea. But this is what I did and this is what got my '03 Marauder running after a failed valve seat.
Adam-------------------------------------------------
If you have a Marauder and haven't done your cooling mod yet, shame on you! And shame on me for never doing it and leading to this writeup.
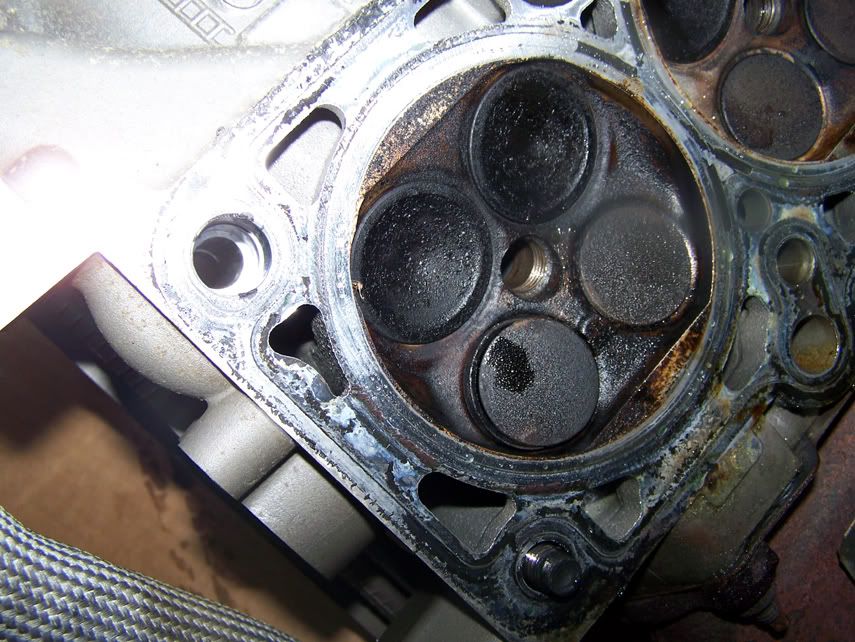
Marauders are notorious for not cooling the rear DS cylinder head well enough. This causes your #8 valve seat to fail, a nice ticking noise, and then eventually your rocker falls out and lands in the corner of the head. The engine will start running like crap, maybe trip a code, and you'll find after a leakdown test that you have zero compression on cylinder #8.
Congrats. Your cylinder head now looks like this inside:
So now you're asking yourself "can I do this myself?"
Well, I don't know. But here's a little bit of a writeup to guide you along the way, should you choose to do it.
DISCLAIMER: if you hurt yourself or someone else in the process, destroy your engine or blow your car up, whatever....it ain't my damn fault. Any time you put your car up in the air with a jack, USE JACKSTANDS. Work safe.Now that that's out of the way, if you still wish to proceed, here we go!
Tools you will need:jack
jackstands
1/4" ratchet
3/8" ratchet
1/2" ratchet
torque wrench
pulley puller
sockets (especially 8mm, 10mm, 13mm, 15mm, and 18mm -
deep well and regular!!!)
extensions
pliers and ChannelLocks
an assortment of screwdrivers
something to catch antifreeze
Tools that will probably make this job way easier:a couple of extra people
plastic bags to hold bolts, or see my
cardboard bolt holder 
impact gun
paint stick or Sharpie
soft mallet
hacksaw
torch
M6 tap
fuel line disconnect tool
10mm GearWrenchshop vac
razor blade
Parts and stuff you will need:RTV sealant
valve cover gasket set (I used the FelPro kit, number
V50477R from Advance)
timing cover seal set (FelPro
45980 from Advance)
DOHC head changing kit (
cheapest w/free shipping from AmericanMuscle)
O-rings for your coolant crossover tube (Ford part 391533-S100, sold in packs of three)
new crank bolt
enough coolant for a proper burp
enough oil for a proper change
an oil filter
anti-seize lubricant
WD-40 or similar
Parts you might want to consider:rear cooling mod (see
www.musclemerc.com for a good one)
timing chain tensioners and guides
upper/lower intake gaskets + throttle body gasket (sold as a package on RockAuto.com -
part number IG4171B)
Procedure**Some of the steps can be done out of order, this is just the way I worked through the project...
Also, I had already replaced my passenger side valve cover gasket and grommets, so this procedure DOES NOT describe removal of that (you'll need to find your own way when it comes to installing grommets and gaskets.1. Turn off rear air suspension.
If you don't know how to do this, STOP NOW, YOU'RE ALREADY IN THE WEEDS.2. Disconnect negative battery terminal.
3. Remove cooling reservoir.
Get ready for a bath. Find yourself something to catch coolant!4. Remove electric fan.
5. Remove water pump pulley
(4 bolts).
6. Remove serpentine belt.
7. Remove belt tensioner
(writeup)8. Place engine at 10 degrees minus TDC.
9. Remove crank bolt (18mm) with impact gun.
10. Remove harmonic balancer with pulley puller.
11. Unbolt power steering pump reservoir and swing it out of the way so it doesn't leak.
12. Remove power steering pump bolts (10mm).
Three can be removed with an extension and a 10mm socket. The last one (above the line, you'll see it), is a PITA. This is where I used the GearWrench. Still a pain but not as bad.13. Loosen and remove the 13mm oil pan bolts
(you're under the car for the PS pump anyway).14. Disconnect your H-pipe from your driver's side exhaust manifold.
15. Remove the cowl and wiper assembly
(series of bolts and screws, not rocket science).
16. Disconnect fuel line.
17. Disconnect the random electrical and vacuum connections going to your plenum/intake.
18. Disconnect EGR at plenum.
You may leave it connected at the exhaust end, because you'll pull it out with the head.19. Remove the throttle body housing.
Swing the linkage out of the way (you don't need to disconnect it).20. Remove the upper plenum and intake.
21. Remove alternator.
22. Remove coolant crossover tube.
May require a couple smacks from a soft mallet. 23. Disconnect and remove coils from spark plugs.
24. Remove DS/PS valve cover bolts.
25. Remove oil dipstick tube bolt.
26. Remove timing cover bolts.
27. Completely remove driver's side valve cover.
28. Lift passenger side valve cover off of timing cover.
29. Remove timing cover.
30. Remove timing chain tensioners and arms.
31. Remove main timing chains
(LEAVE THE ONES ON THE CAMS!).
32. Using a breaker bar, remove all 10 cylinder head bolts.
33. Pull dipstick out of its hole in the oil pan, but leave it threaded through exhaust manifold.
34. Find some helpers and a landing place for your cylinder head.
35. Lift the head off of the motor, dipstick and manifold attached!
May work best if you have someone standing in the engine compartment!36. Remove dipstick.
37. Remove exhaust manifold.
38. Tape off in your intake on the passenger side, or stuff clean rags/paper towels in there.
39. Spray all open areas down with some oil. I used WD-40.
The car will be sitting for a while.At this point, you've done what you can. Find a machine shop, negotiate a price, and send it off to have new valve seats and most likely a valve installed since you've likely bent one.
While you're waiting for your head to come back, you can clean your timing cover and valve covers, and install the gaskets that you bought. So let's pretend you've done that...moving on...
40. Reinstall exhaust manifold/EGR to head.
Swing EGR tube into approximate correct location.40. Clean lower intake to head surfaces carefully.
I used a razorblade, then shop-vac'd all the mess up.41. Ensure your block-to-head surface is clean.
Consider cleaning gently with some carb cleaner and clean rags. Can also clean the pistons in this manner...CAREFULLY. I coated the cylinder walls with a small film of oil.42. Place LH head gasket onto block, ensuring proper fitment.
43. Get your friends again.
44. With one person under the car to line up the exhaust flange/bolts, have two other people place the cylinder head squarely onto the engine.
There are some, well Idunno what they're called, but things sticking up to help you align them.
WARNING: your #6 cylinder will likely be at or near deck height. You will need to use an 18mm socket on your head before it is installed to close your #6 valves which should be wide open at this time. Otherwise you'll have a collision of piston + valves before you even start the car.45. Coat the threads of your head bolts in motor oil.
46. Torque to following specs: 30 ft-lbs, loosen all. Then 30 ft-lbs again, +90 degrees, +90 degrees.
Admittedly I can't remember the sequence at this time, but basically, start in the center top, then immediately underneath. Then work diagonal back and forth, up and down across the head.47. Reinstall timing chains.
This is how I did it.
47a. Line timing chain up like this:

47b. Using a paint marker or Sharpie, mark the opposing end links.
47c. While the paint dries, find your lower timing gear set (whatever the hell it's called). Place it on the crank, dot side facing out. The dot should be at 6 o'clock.
47d. Place the driver's side timing chain on the lower gear. Your marked link should go 'around' the dot as follows.

47e. Place the driver's side timing chain on the cam gear, ensuring that the marked link goes 'around' the dot as seen above.
47f. Repeat 47d and 47e for passenger side. It may be necessary to use an 18mm socket on a breaker bar to turn the cams on the passenger side to get them to line up. Do so carefully, but make sure they line up.
47g. DOUBLE CHECK YOUR WORK.
48. Place tensioner arms on their spindles. I chose to replace mine as the passenger side arm was down to bare metal.
49. Bleed down old timing tensioners to aid in reinstallation.
See 6:14 in this video.50. Reinstall tensioners, pull paperclips.
51. Reinstall old crank bolt with several washers, then turn the engine slowly with a 18mm socket/ratchet combination. Feel and listen for interference.
If it works, then slide your crank trigger wheel onto the crank. If not, you screwed up and will need to try timing it again.52. Put a dab of RTV in the areas marked in this
diagram. Otherwise your engine will leak.
53. Reinstall timing cover and torque bolts down in the order shown
here.
54. Reinstall valve covers, adding a dab of RTV where the head meets the timing cover on top.
55. Install dipstick.
You may experience difficulty getting it to line up due to the extra/unnecessary tubing on the end. You can use a hack saw or tubing cutter to remove some tubing - I left 1/4" below the O-ring to ensure it would still seal. You may need a friend to gently hit the bracket with a hammer while you guide it underneath to help it into place. 56. OPTIONAL: Using an M6 tap, gently clean up the threads for the bolts that connect the lower intake to the heads. I snapped one IN the head. Bolt welded itself in place, and no amount of Easy-Outing it would get it free. Ended up drilling through it, retapping the bolt itself, and hoping for the best. NOT OPTIMAL!
ALSO OPTIONAL: If you're doing a rear cooling mod (A SMART DECISION), this would be an ideal time to install it.
57. Place lower intake gaskets, install intake.
58. Place plenum gasket, install plenum.
59. Re-attach throttle body linkage with fresh gasket between plenum and TB.
60. Install spark plugs in head (spec is 11 ft-lbs, I went 12. Don't use too much anti-seize.), add coils and connect everything up. Install coil cover.
61. Start realizing that all of your electrical and vacuum connectors are lining up with things that need to be plugged in. Plug them in.
62. Reinstall alternator on lower two bolts.
63. Install coolant crossover tube with new O-rings on the lower part.
Installation may require some persuasion with a soft mallet. And you may need to install new O-ring (available at any parts store) on the cap for your crossover.My crossover cap was seized on. Needed to use a MAP torch to heat the surrounding area and then remove the cap. If you must do this, ensure that you remove the old O-ring that you've melted, clean the area, and reinstall using anti-seize. It does not need to be very tight at all.
64. Install alternator bracket (this also holds your coolant crossover tube in place).
65. Reinstall power steering pump, inventing new swear words in the process.
66. Ensure your front 4 oil pan bolts are snugged up while you're under there.
67. Reinstall harmonic balancer, using some RTV on the keyway to prevent leaks.
68. Reinstall water pump bolts, torque to hand-tight.
69. Reinstall belt tensioner.
70. Reinstall serpentine belt.
71. Torque water pump bolts down.
72. Reinstall coolant reservoir and connect radiator hoses.
73. Reinstall PS pump reservoir.
74. Change oil and filter.
75. Fill coolant reservoir with coolant, burp the car as outlined
here (this also involves starting your car for the first time - so listen for bad noises and check for leaks/smoke! Some smoke will be normal on startup but should dissipate while burping the car. Also, your lifters will make some hellacious racket on the first few starts, so be prepared for that).
76. Provided there are no leaks, reinstall wipers and cowl.
77. Turn on rear air suspension.
78. Have a beer!


 Previous Topic
 Index
Index

 Your Privacy Choices