#2416111 - 11/30/1104:10 PMRe: 2009+ window/lock/mirror switch write-up. FULL VER
[Re: Drac]
ALPHA
Over the Hill
Registered: 05/14/10
Posts: 1861
Loc: butte, ca
FULL OF SO MUCH WIN
another BOK for the site
_________________________ USGI Mil-Spec Disposable Tactical Retention Straps AKA ZIP TIES FULL P71 Site Download someone buy me stap stickers, i love those things alpha@crownvic.net
#2416289 - 11/30/1109:05 PMRe: 2009+ window/lock/mirror switch write-up. FULL VER
[Re: Drac]
BlackVic_P71
Grand Poobah
Registered: 08/28/09
Posts: 14602
Loc: LI, NY
Ok, when is this going into the BOK? I need the plugs and rear switches.
_________________________
Originally Posted By Jeremy Clarkson
The future is very fast and extremely quiet...but a bit burny.
1989 Ford Crown Victoria Country Squire - 347 2005 Crown Victoria LX Sport with Stainless Works full exhaust, Addco swaybars, Heinous control arms, Powerslot rotors, Hawk HPS pads Accufab plenum for a DBW Panther Blue LED buttons/switches how to
#2417401 - 12/02/1108:46 PMRe: 2009+ window/lock/mirror switch write-up. FULL VER
[Re: Drac]
ALPHA
Over the Hill
Registered: 05/14/10
Posts: 1861
Loc: butte, ca
rather easy setup, now we just need to have a plug and play harness that has the relays built in, anybody know were to get those plugs, other than from ford, ill make harnesses.
_________________________ USGI Mil-Spec Disposable Tactical Retention Straps AKA ZIP TIES FULL P71 Site Download someone buy me stap stickers, i love those things alpha@crownvic.net
#2423982 - 12/15/1101:54 PMRe: 2009+ window/lock/mirror switch write-up. FULL VER
[Re: Drac]
ALPHA
Over the Hill
Registered: 05/14/10
Posts: 1861
Loc: butte, ca
BUMP
FOR BOK
_________________________ USGI Mil-Spec Disposable Tactical Retention Straps AKA ZIP TIES FULL P71 Site Download someone buy me stap stickers, i love those things alpha@crownvic.net
#2423986 - 12/15/1102:09 PMRe: 2009+ window/lock/mirror switch write-up. FULL VER
[Re: ALPHA]
Drac Cpt. Smug Over the Hill
Registered: 03/19/10
Posts: 3345
Loc: Cali
Originally Posted By: ALPHA
BUMP
FOR BOK
you don't have to keep bumping this man. the mods/admin know it's here, and they will add it to the BOK when they see fit.
_________________________ 2004 Crown Victoria finished in Dark Pearl Blue Metallic (DX) | Ported M122 powered DOHC conversion with all supporting mods. Dyno queen. 2010 BMW M5 V10 finished in Monaco Blue Metallic with 2-tone interior | Eisemann race exhaust | Lowered On Dinan coilovers. Daily Driver
#2424311 - 12/16/1103:09 AMRe: 2009+ window/lock/mirror switch write-up. FULL VER
[Re: Drac]
ALPHA
Over the Hill
Registered: 05/14/10
Posts: 1861
Loc: butte, ca
im not on nearly as much as i use to....sorry everyone...i get bord
_________________________ USGI Mil-Spec Disposable Tactical Retention Straps AKA ZIP TIES FULL P71 Site Download someone buy me stap stickers, i love those things alpha@crownvic.net
Hello I am new to the forum, as I am sure you all can tell. I recently have tackled the retro fit of the 2009 window controls in my 2006 P71. I had no issue with the passenger side, as far as the window controls, however when I got to the power locks, I ran into numerous issues. So I got on the forum here and found this one. There is allot of great information on this retro fit, however it would seem that he color of my wires in the 2006 do not match the write up above. Someone please help me. It is very frustrating to drive around with two different window controls that do not match. I am located in Tampa, FL... It would be greatly appreciated if someone was willing to call me and walk me through the rest of the install.
#2526981 - 05/21/1201:15 PMRe: 2009+ window/lock/mirror switch write-up. FULL VER
[Re: Drac]
Drac Cpt. Smug Over the Hill
Registered: 03/19/10
Posts: 3345
Loc: Cali
you may have to extend the wiring a little bit, unless you just want to mount the relays right at the DDM. otherwise, no new wiring should need to be added. just cut where you need to, crimp on insulated disconnects, and attach the leads to the respectable circuit on the relay(s)
nice work on un-pinning and re-pinning opposed to cutting on the windows. they are indeed a piece of cake. i'm sure you'll love these new controls. i've had them for 9 months and they are VERY nice.
_________________________ 2004 Crown Victoria finished in Dark Pearl Blue Metallic (DX) | Ported M122 powered DOHC conversion with all supporting mods. Dyno queen. 2010 BMW M5 V10 finished in Monaco Blue Metallic with 2-tone interior | Eisemann race exhaust | Lowered On Dinan coilovers. Daily Driver
#2528168 - 05/23/1205:24 AMRe: 2009+ window/lock/mirror switch write-up. FULL VER
[Re: BigNSlow]
Drac Cpt. Smug Over the Hill
Registered: 03/19/10
Posts: 3345
Loc: Cali
Originally Posted By: BigNSlow
Finally finished my upgrade. It's a really simple mod if you pay attention to detail. All my issues were due to my own mistakes. I switched a couple of wires for master window controls around. Yellow/Green and Yellow/Blue look similar. Took me a few hours of messing around to finally figure that out.
Then while blowing fuses I managed to install one of the fuses in the wrong spot which resulted in my window locks to stop working.
The whole job could be done in a couple of hours easily.
I repinned all the window connectors and mounted 2 relays right above the DDM. It ended up looking very clean and almost factory.
happy to hear you got it all working Serge. when i first did this mod to my 2004, it took me the better part of the entire day to complete. however when i did it to my 2003, it took me only a few hours, because i learned what works and what doesn't.
Originally Posted By: BigNSlow
Drac, could you add to your write up something about master window controls that it's just a matter of matching up all the wires similar to the rest of them?
not quite sure what you are asking here.. lol. do you want me to integrate in a section that talks about re-pinning and year-specific instruction versus cutting and spicing based on color coding? please be more specific. :p
_________________________ 2004 Crown Victoria finished in Dark Pearl Blue Metallic (DX) | Ported M122 powered DOHC conversion with all supporting mods. Dyno queen. 2010 BMW M5 V10 finished in Monaco Blue Metallic with 2-tone interior | Eisemann race exhaust | Lowered On Dinan coilovers. Daily Driver
#2530077 - 05/25/1209:29 PMRe: 2009+ window/lock/mirror switch write-up. FULL VER
[Re: Drac]
95ltc
Climber
Registered: 05/08/12
Posts: 702
Loc: Fort Worth, TX
Thats badass!!! anyone know if theres a way that i can use newer style switches because all of mine are falling out due to the mounts are gone. I cant find any to replace them so might as well do some newer ones!!
_________________________
-Drew 95 town car (gone) 01 silverado 08 town car
#2537364 - 06/07/1205:19 PMRe: 2009+ window/lock/mirror switch write-up. FULL VER
[Re: BigNSlow]
Drac Cpt. Smug Over the Hill
Registered: 03/19/10
Posts: 3345
Loc: Cali
Originally Posted By: BigNSlow
Well your write up doesn't really mention anything about master window switch other than wiring diagrams. I was a little confused at first and wasn't sure if all wires are the same or they have to be rewired.
well.. for it to work for me, all i did was to match the wire colors for the window switch leads. i can ask Larryo for an in-depth wiring diagram for specific years and post the schematics here for people that are looking to do this swap in the future.
_________________________ 2004 Crown Victoria finished in Dark Pearl Blue Metallic (DX) | Ported M122 powered DOHC conversion with all supporting mods. Dyno queen. 2010 BMW M5 V10 finished in Monaco Blue Metallic with 2-tone interior | Eisemann race exhaust | Lowered On Dinan coilovers. Daily Driver
#2625908 - 11/12/1202:24 PMRe: 2009+ window/lock/mirror switch write-up. FULL VER
[Re: Drac]
Drac Cpt. Smug Over the Hill
Registered: 03/19/10
Posts: 3345
Loc: Cali
Revised version for BOK submission.
The following guide discusses the neccessary steps requires to successfully retrofit in 2009+ window/lock/mirror control switches into a 2003-2008 Crown Victoria or Grand Marquis. originally authored on 7/5/11. revised on 11/10/12 by Drac.
Ever since 2009, i have been intrigued by the new recessed window controls Ford had added to the Panthers. One day while looking at some pictures of a 2010 CVPI, i decided it would be a neat mod to integrate the 2009+ controls into my car. I soon after that started trying to locate the needed parts. You will need to get the pigtails along with the switches AND switch plates from the 2009+ car, as it all changed for the most part. It took me almost 7 months of searching to locate a full set of 2009+ controls and pigtails, and i didn't even get them all from one person. between two different eBay power sellers, and a member here on CVN, i was finally able to have a full set. Soon after acquiring the parts, the mod got put on the back burner due to other car-related ambitions i was pursuing at the time. About 5 months later, i decided it was time to finally install these and make a writeup.
After having my 2010 window/lock/mirror controls sitting around forever, I finally decided it was time to install them. Instillation for the window switches was pretty strait forward. The locks and mirror control was a little more involved however. The pigtails for the locks, mirror control, and back seat switches are completely different, but the wire colors (for the window control) remained the same. The master control�s window switch pigtails are physically the same, BUT the wiring is completely different. So a complete re-wire is necessary.
STEP ONE: acquiring the parts.
I was able to get the rear window switches and pigtails from 2006_P71. He informed me of a wrecked 2009 P71 at his local junkyard. He was able to get me the rear switches and pigtails, but unfortunately the front switches were gone. Fortunately I was able to get the front switches (driver�s and passengers out of a 2010) off eBay for $50 shipped to me. Unfortunately the front controls didn�t include the pigtails. So I ended up messaging 2006_P71 and asked him if he could get the pigtails out of the wrecked 2009 he had gotten the rear switches from, and send them to me. He agreed, and went to the yard and snipped them off and shipped them to me.
STEP TWO: assessing the install.
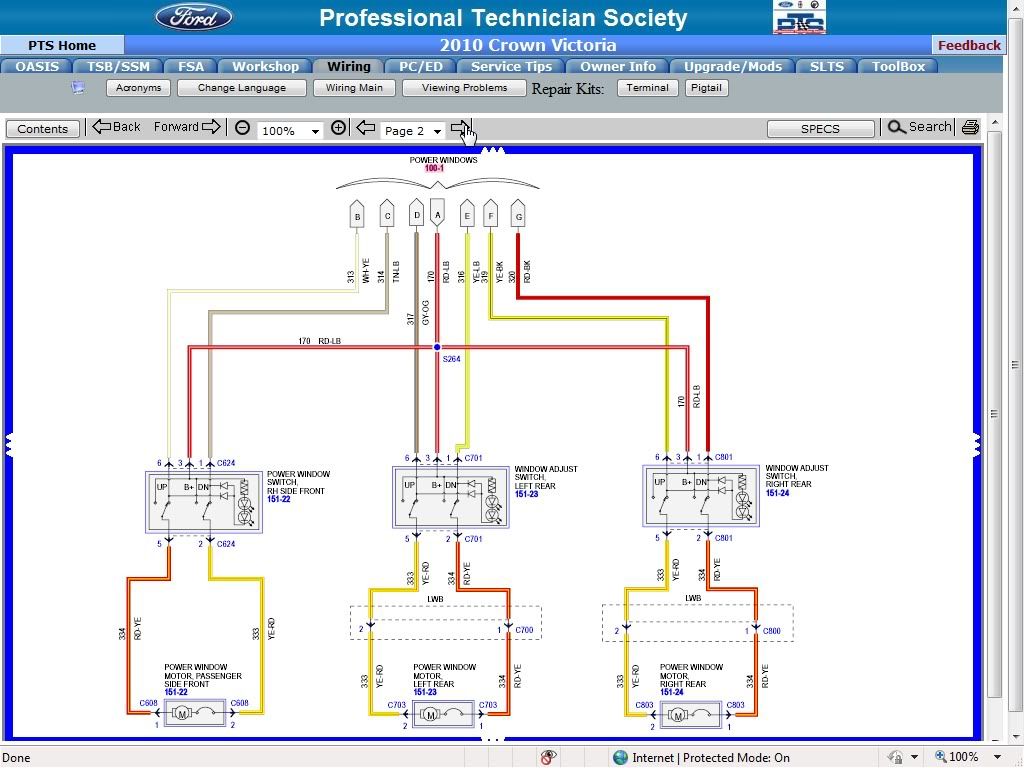
I already had a wiring diagram booklet for my year (2004) and after PMing larry (Larryo340) he was able to get me wiring schematics/diagrams for the 2009+ Crown Victoria window/lock/mirror controls. So now, I could start to map out what wires went where. What I ended up doing was i wrote every wire lead down on an 8 � x 11 piece of paper and drew lines to where the lead was supposed to go on the 2009+ switches. While looking at the wiring diagrams for both years, I soon found out the window controls for all windows are all the same colors throughout the production of the panther. What this means is you can simply color match the leads between the 2003-2008 and the 2009+ pigtails and it will work. The power locks and power windows are all one big loop that is extended off of the master controls. Basically what this means is; the passengers switch, and both backseat switches are just extensions of the master controls, with switches in them that allow for usage in that location. The entire system is standalone; for the most part.
STEP THREE: starting the install.
WINDOW CONTROL
The windows on this project are the easiest part. Essentially all you have to do is to color match all the leads. This goes for the master control, passengers control, and both rears. You have one of two ways you can go about making the connections: cutting and re-connecting the new 2009+ harness lead for lead, or physically re-pining the 2009+ connector. I decided to just cut the connector and attach the new pigtail. either route will function fine as long as the connections are solid and tight, however people with a very high level of attention to detail may opt to re-pin their connector opposed to cutting and splicing. all boils down to preference.
Start by disconnecting your battery�s negative cable. I installed the rear controls first. The wiring colors will remain the same between 2003 all the way till 2011 for the window controls. (all of them) actually as a matter of fact, pre-2003 panthers have the same wiring colors too; because my 2000 had the same colors as the 2004 switches that I installed in it; but I digress.
For the rears, just pop out the switch plate from the front (be careful when doing this!) and you should have a blue plug going into your 2003-2008 switch. the 2009+ plug is physically a little smaller than the 2003-2008 plug, and is gray opposed to blue. Here�s a picture to show you�
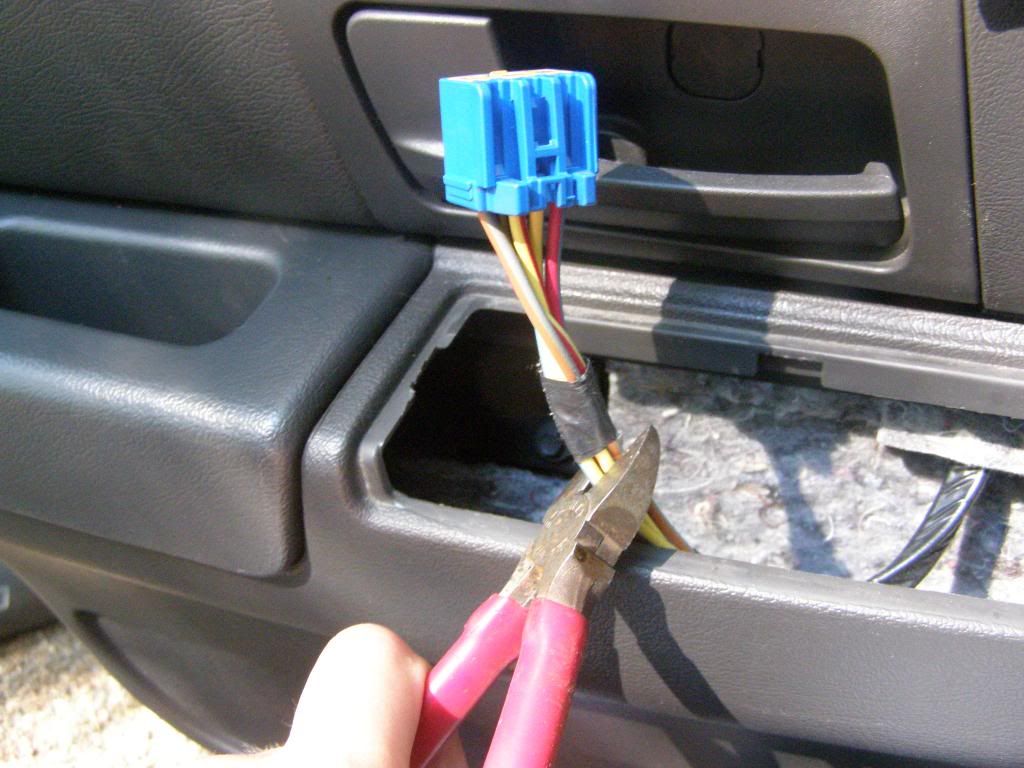
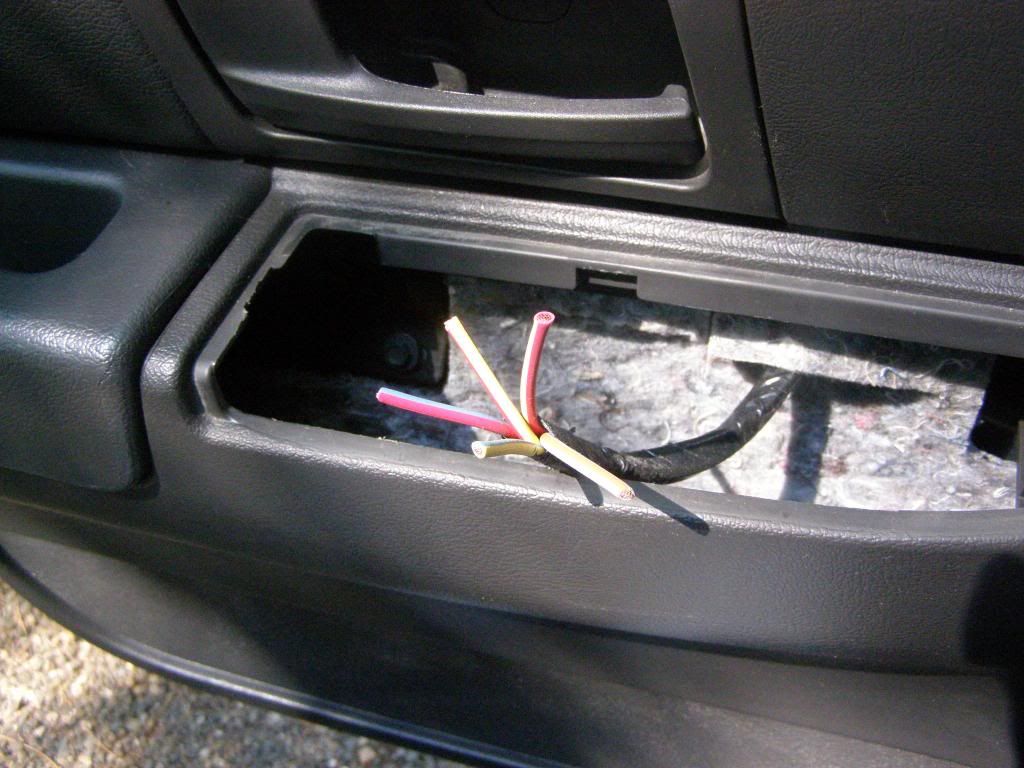
There is no place to simply �unplug� the pigtail from the door harness, so unless you opted to to de-pin the entire connector, go ahead and cut it.
Cutting the factory harness
Harness cut
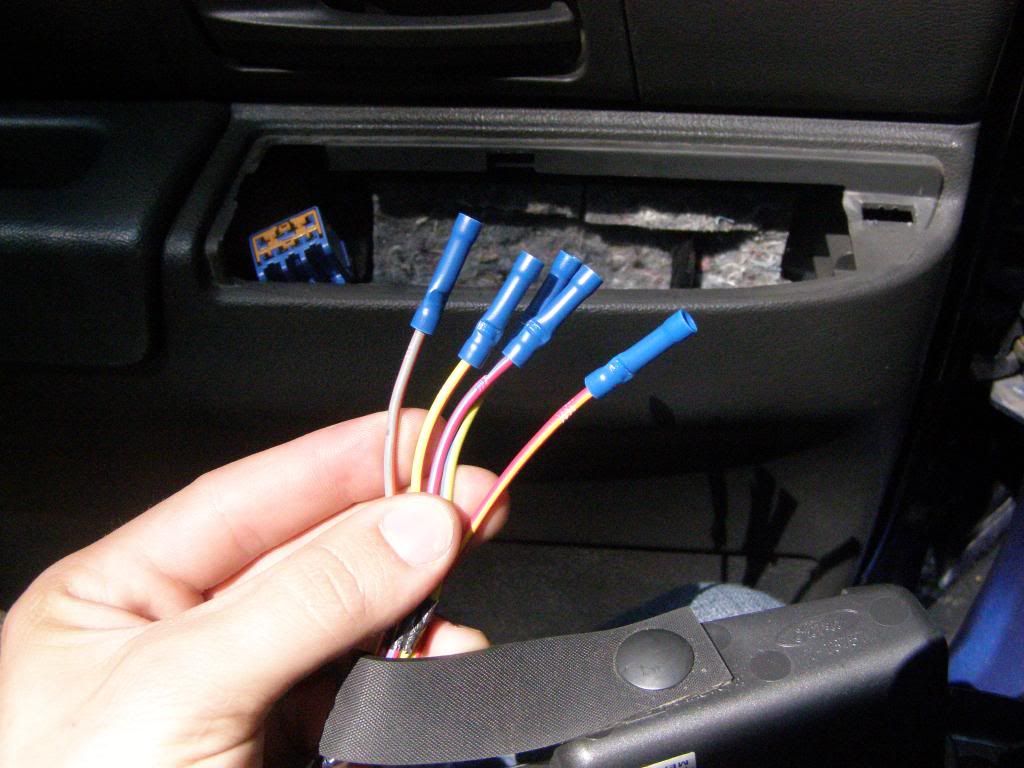
After you cut the factory harness and strip back about a third of an inch of insulation, you are ready to connect the 2009+ pigtail. I opted to use simple, yet effective butt connectors. I was going to use fully insulated quick disconnects, but I didn�t want to spend $40+ on about 50+ sets of quick disconnects for ALL the wires on all 4 doors. And I knew I wouldn�t be taking the new switches out anytime soon. So I just used butt connectors.
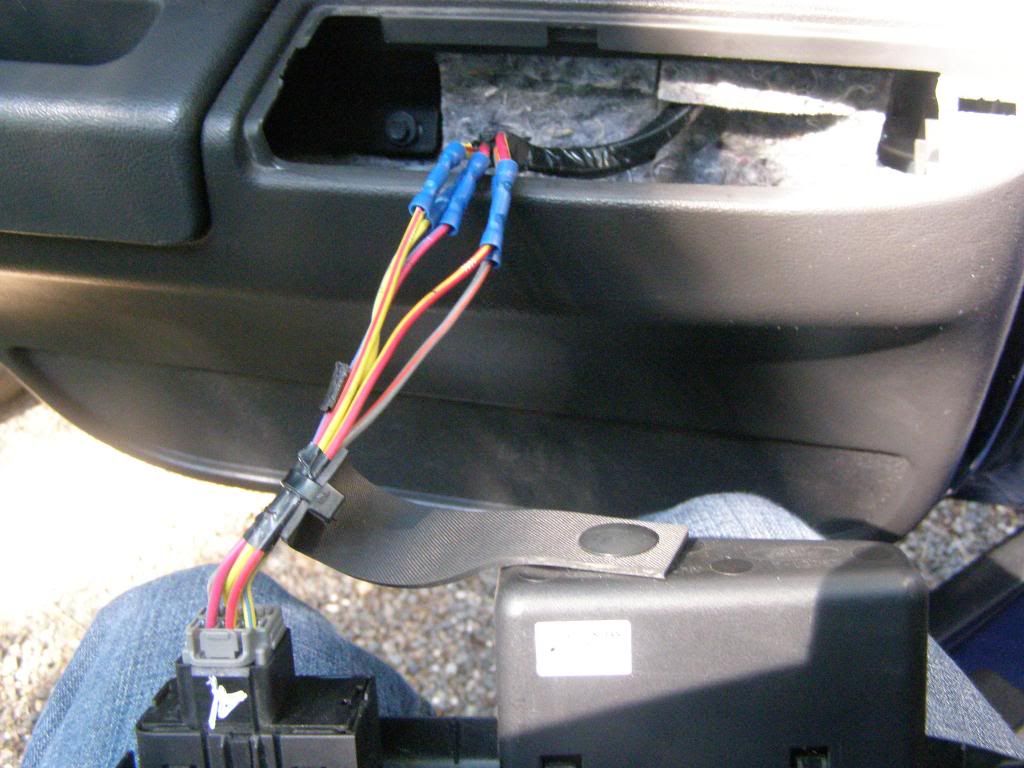
New switch/pigtail ready for instillation (before and after)
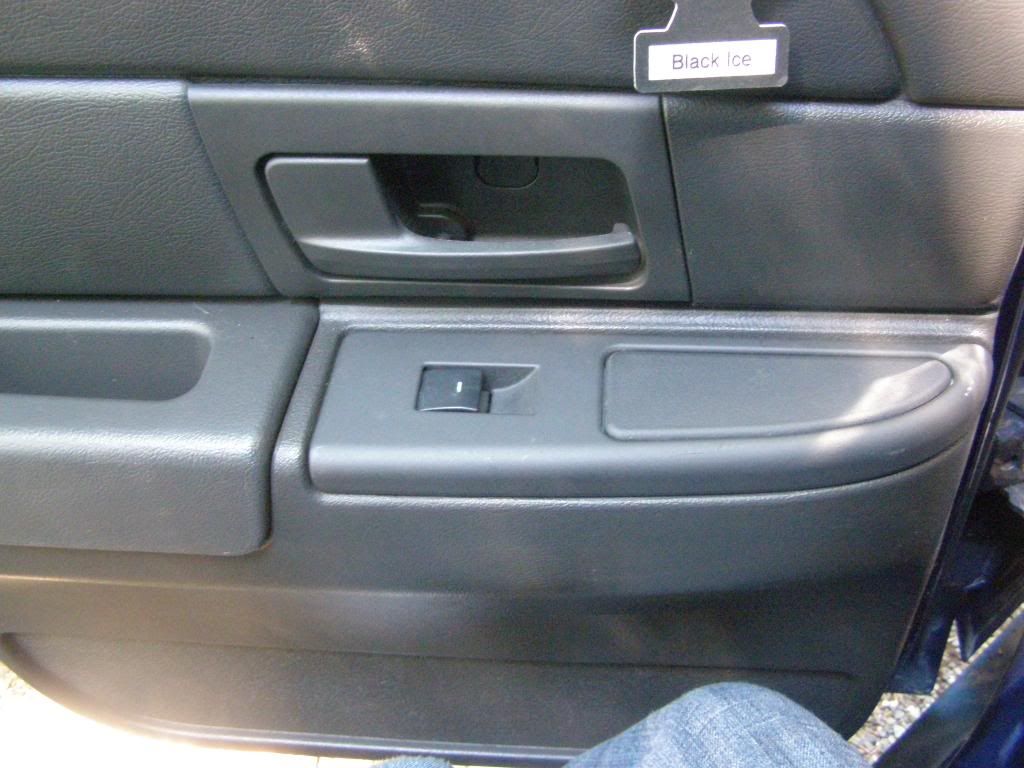
Finished product (rears; after switch plate was re-secured to the door trim panel)
And, like I said- wire colors are the same for all window controls throughout the car (all 4 controls; even the master) so just match color to color and you�re good to go! Second rear window control is a reflection of the first.
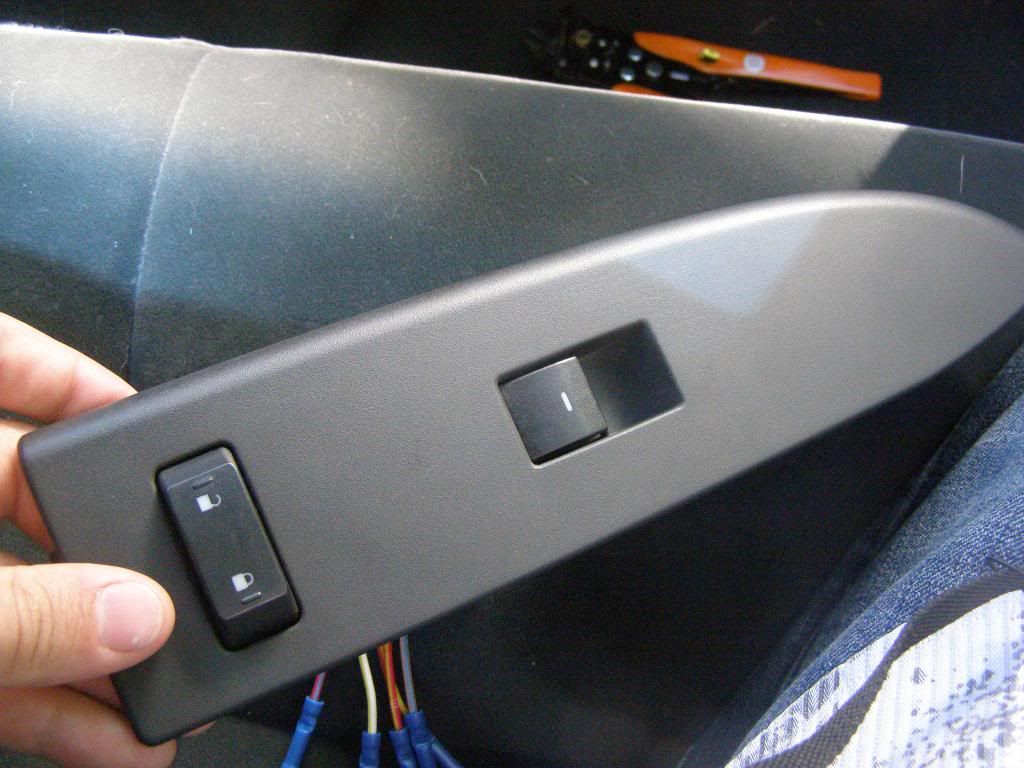
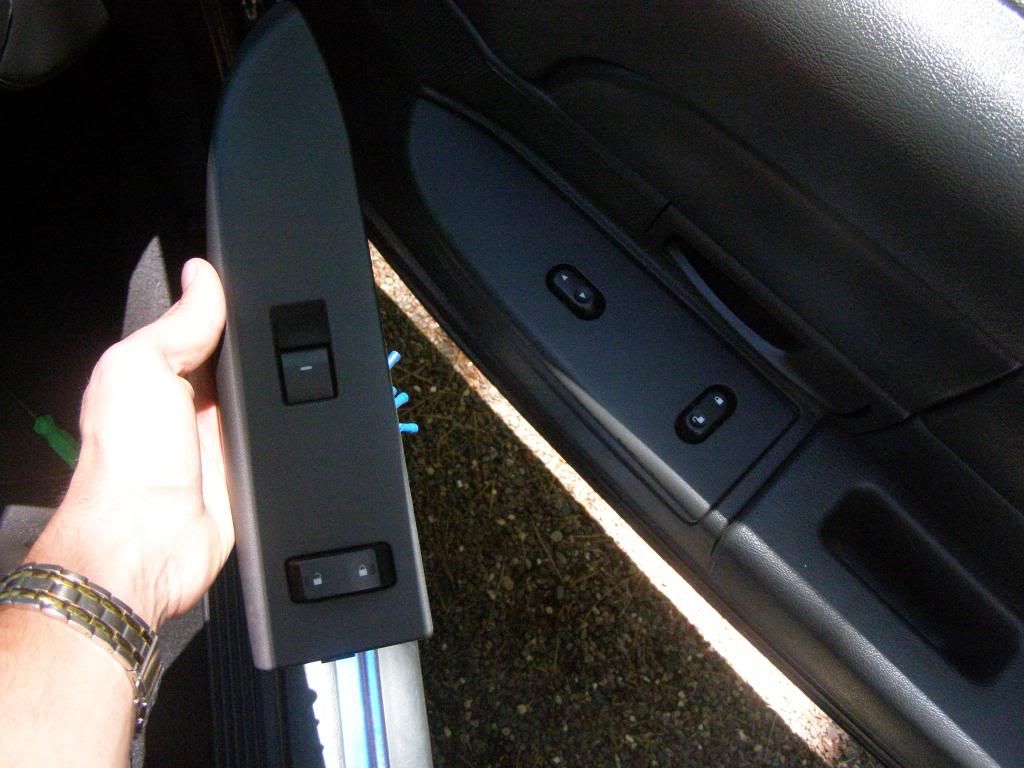
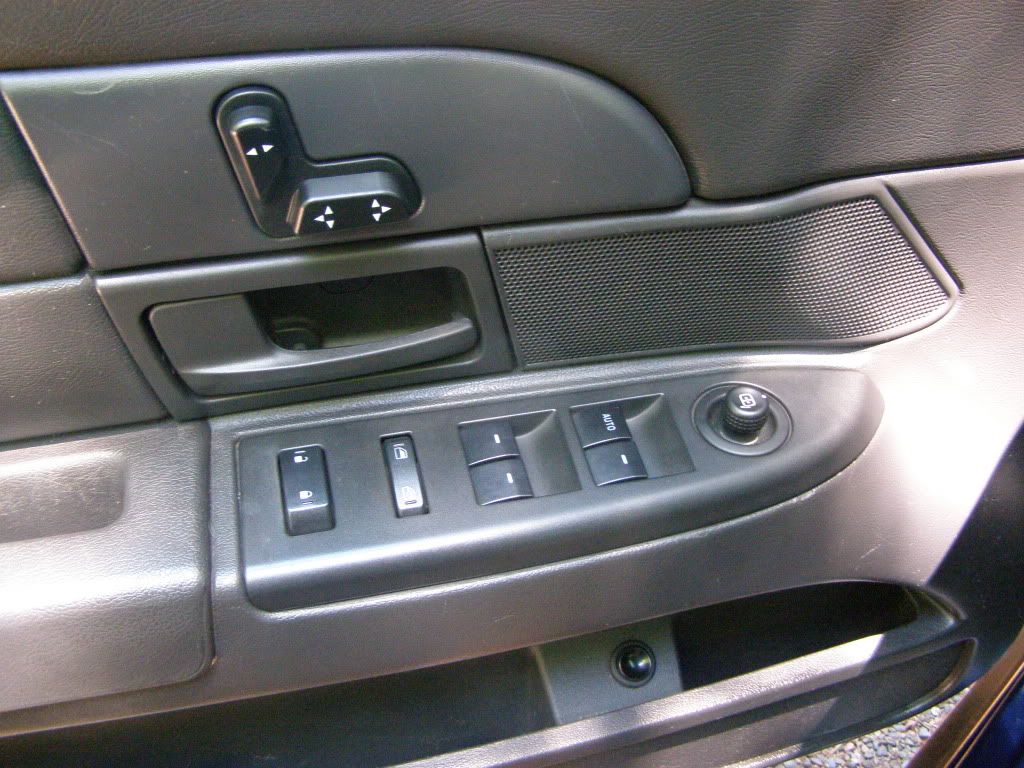
FRONT PASSENGER CONTROLLER INSTALL: Moving on to the front passenger�s controller- the window controls are as easy as the rears, but the locks are a bit trickier; and will be covered in the next section. To start, here is a picture of the newer style switches, and a comparison to the older 2003-2008 style switches.
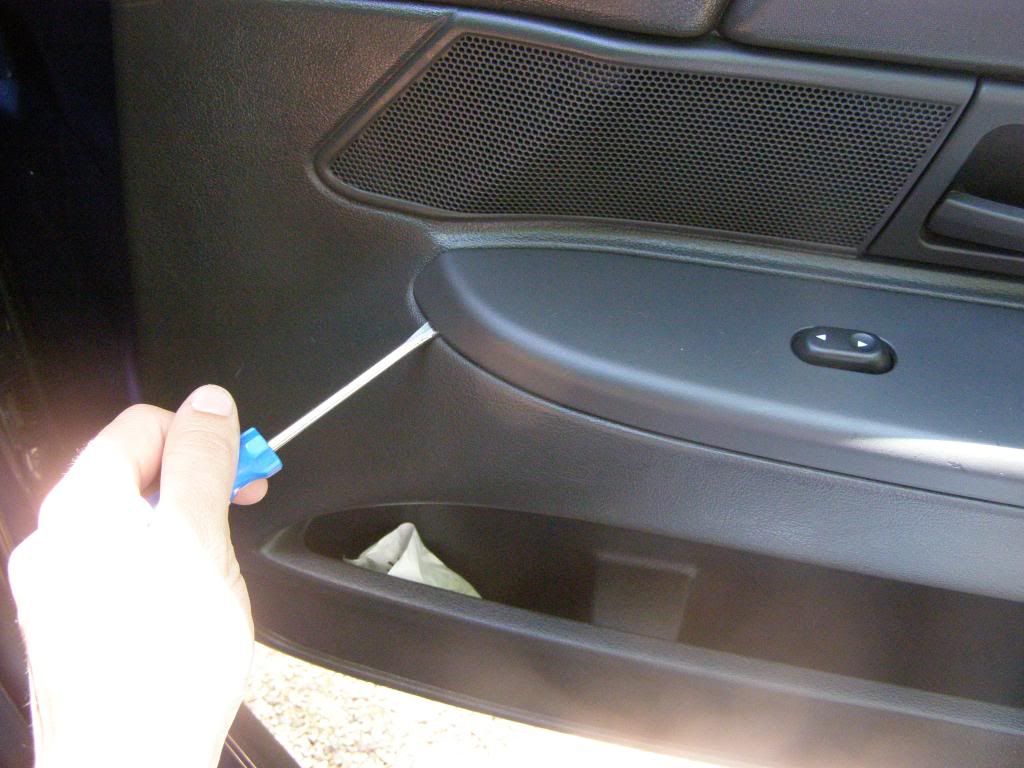
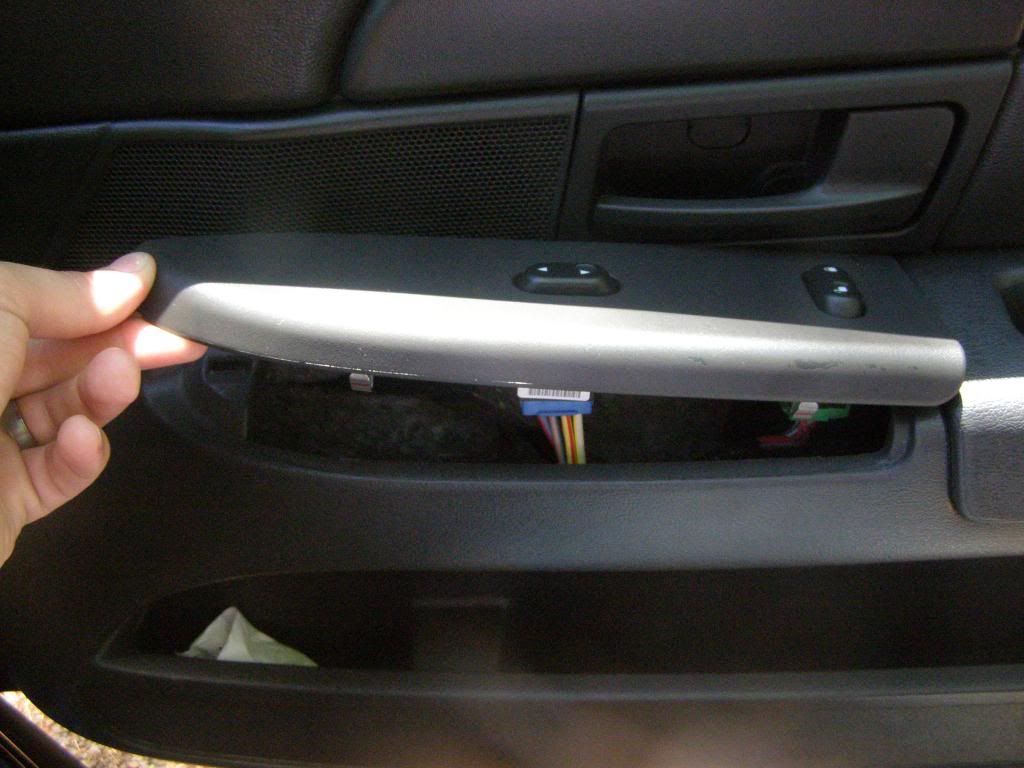
pop up the switch plate. use flat head screwdriver to GENTLY pry up on the FRONT of the switch panel. but once again, BE CAREFUL!!! Pop up the front first, than slide it forward to allow the rear snap to slide out and not break!! Here are a few pictures.
Color match the leads and your done with the window control for the passengers side.
For the master controls- the pigtails are actually the same for the window control (this is the only pigtail that is the same as the 2003-2008's) however they are pinned totally differently. i'd suggest doing one pigtail at a time as to not get overwhelmed. There are a LOT of wires going into the master controller, and getting wires confused and making wrong connections can happen. On the 2009+ pigtails for the window controls on the master, some leads for each pigtail may come from the neighboring window pigtail on the 2003-2008 side. (not all leads from the blue connector on the 2003-2008 side go to the blue connector on the 2009+ side.. some go the green connector, and vice versa) color match the leads and make your connections.
LOCK CONTROL
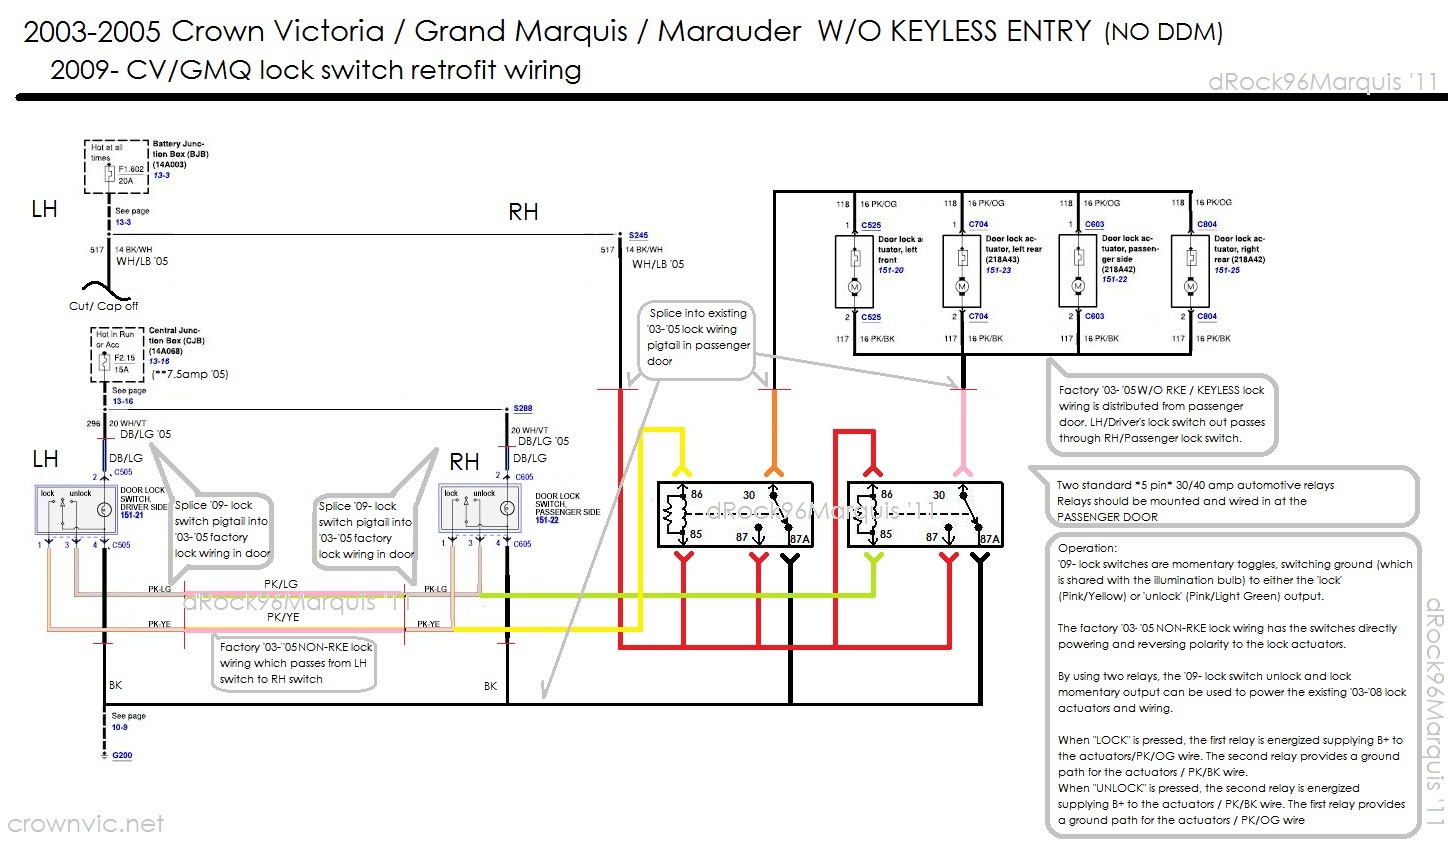
Instillation of the locks on the 2009+ switches aren't as easy as just cutting the wires and color matching. because of the difference in operation between the 2008 and previous locks and the 2009 and newer locks, we will have to wire in relays to get the locks to function. normally on 2009+ cars, the locks function thru the DDM, and without that DDM function present, the locks won't work. so wiring in relays will allow us to bypass the DDM and get usage of the locks without it.
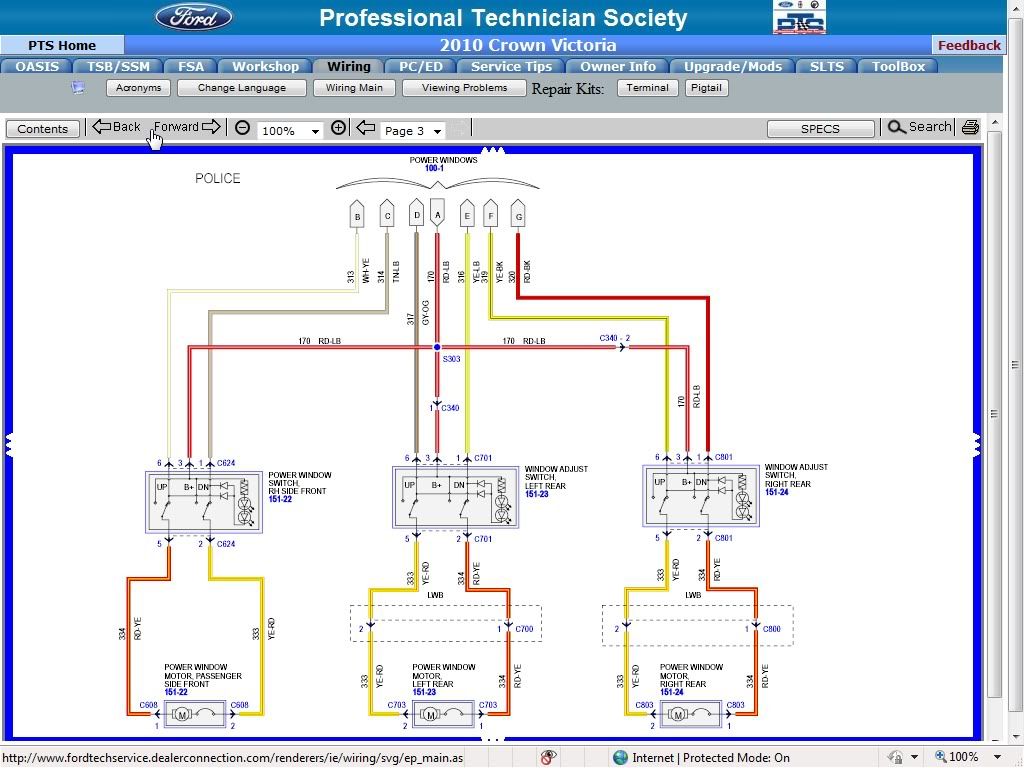
in 2006, Ford offered RKE (remote keyless entry) as a factory option on P71's. however, the locks don't rely solely on the DDM for power from 2006-2008, like they do starting in 2009. what this means is that 2006-2008 P71's as well as P73's and P74's still use the older technology to power the locks, and don't rely on the DDM for switched power 100% of the time. however a different wiring schematic is needed for cars with a DDM then the cars without.
RELAY INTEGRATION
For starters, cars with DDM's and cars without DDM's will use 2 completely different wiring schematics to get the locks to function like i said. 2003-2005 P71's wont have a DDM present, and 2003-2008 P73's, P74's, M74's and M75's will have a DDM present. 2006-2008 P71's MAY have a DDM present, depending on optioning/RKE.
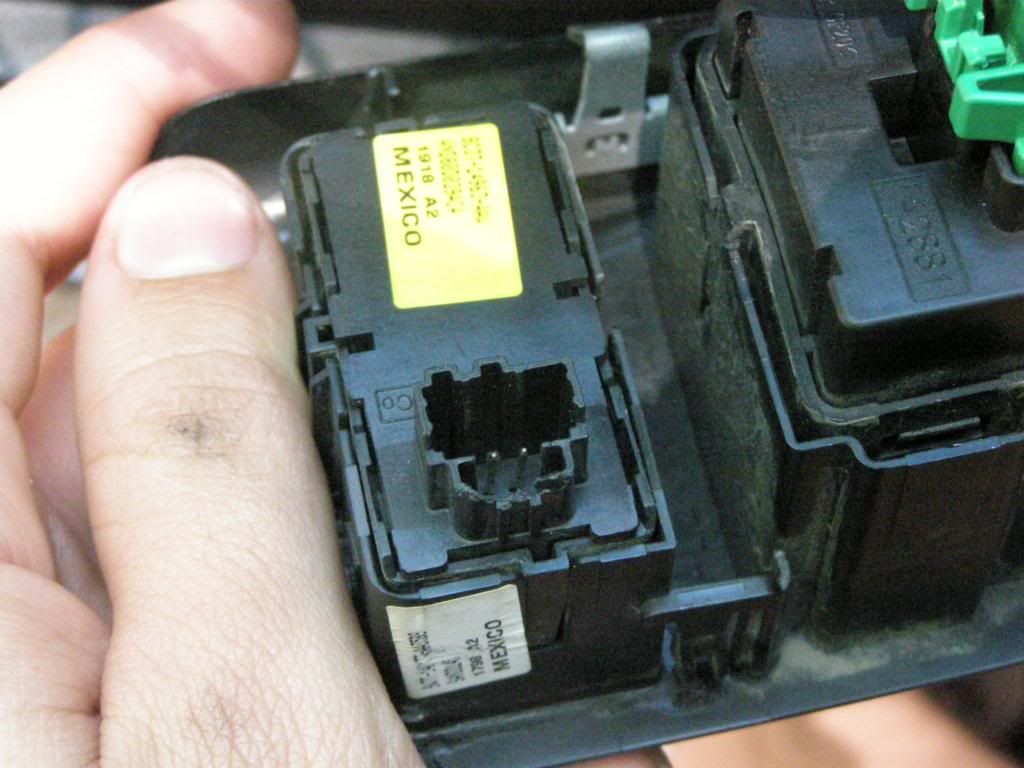
The DDM is located in the driver's side door panel towards the bottom on the front, behind the door trim panel. take of the trim panel, and it's a small black box on the lower, front-most section of the door behind the trim panel.
a special thanks to Derek (dRock96Marquis) for putting these diagrams together!
below is the diagram needed for 2003-2005 P71's. one thing to note- the yellow lead going into pin 86 on the 1st relay, and the green lead going into pin 85 on the second relay, you are going to want to flip these leads around. i explain why you need to do this in one of the attached videos below.
Right click > View image (for full size)
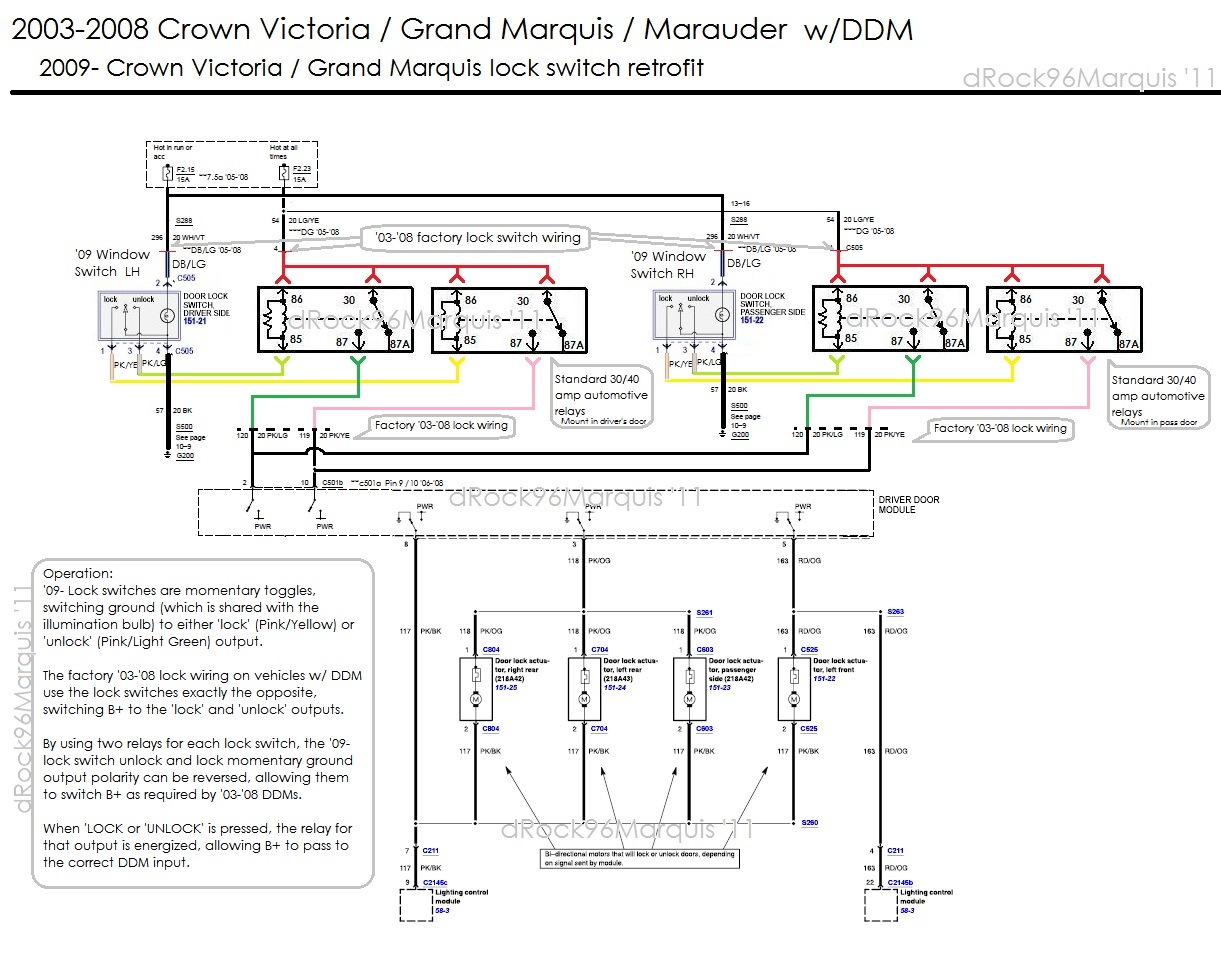
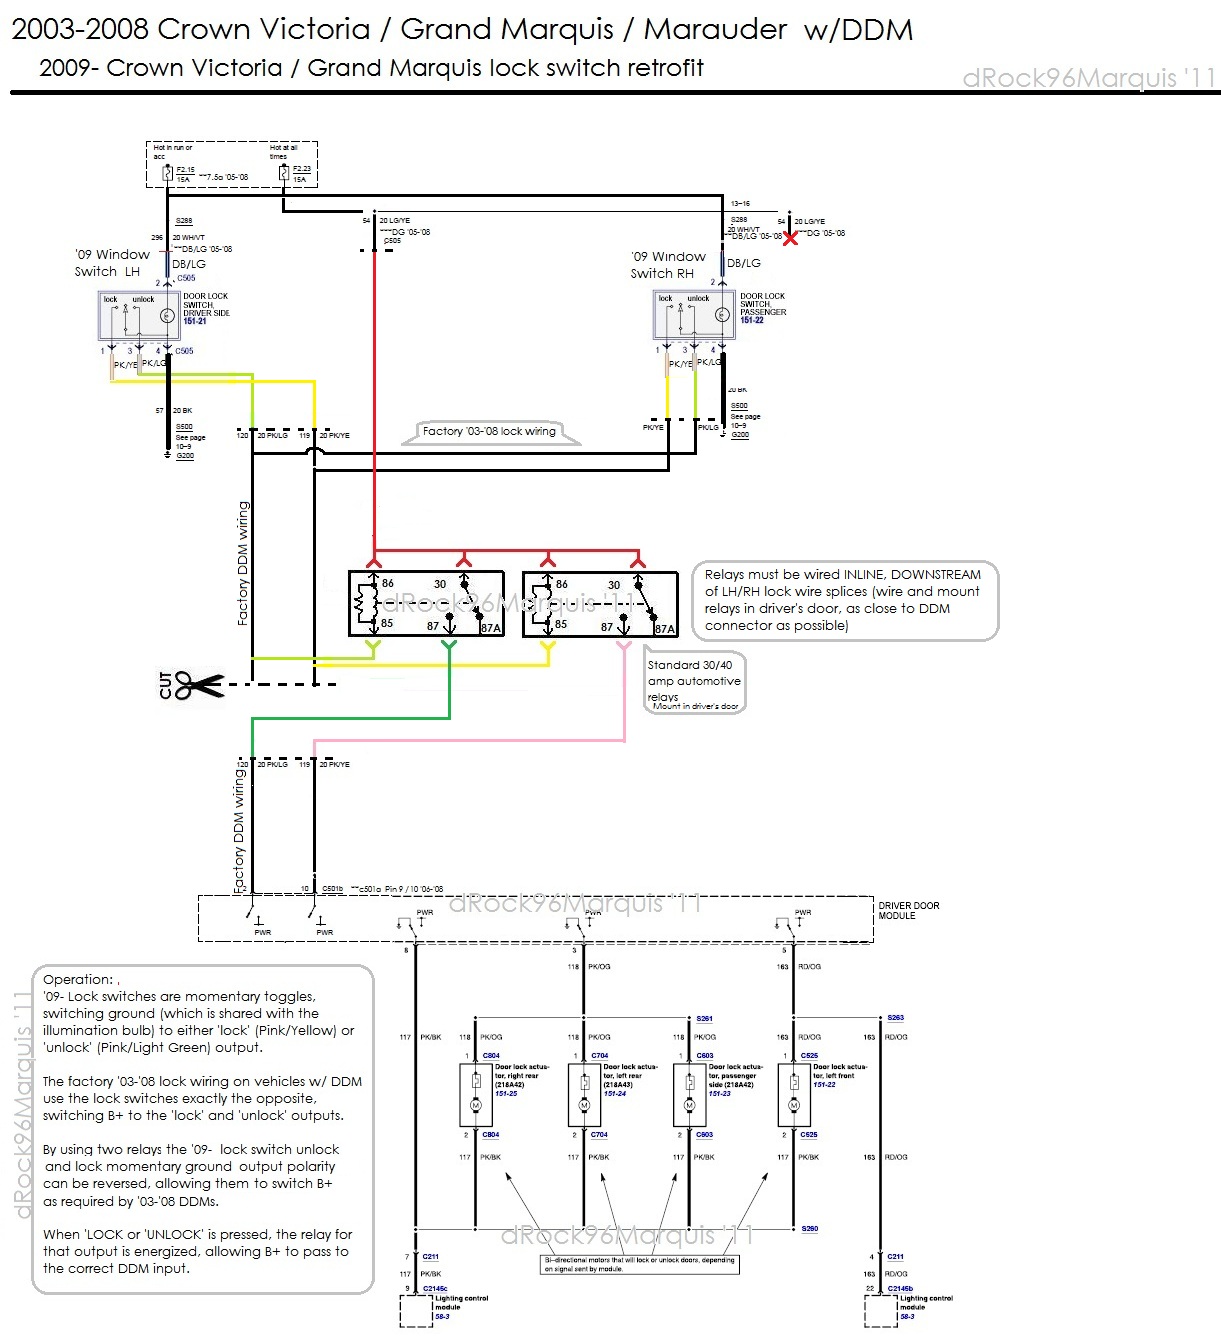
Below is a schematic for 2003+ vehicles equipped with a DDM. this schematic utilizes 4 relays, however there is also a way that you can use just 2, but it requires you to splice into the leads going into the DDM. The relays would be INLINE of the PK/YE / PK/LG wires going to the DDM, you just have to make sure this is DOWNSTREAM of the splices into DDM harness (coming from RH side) - so as close to the DDM as possible (will need to unwrap harness some so you have a little play)
the schematic with 4 relays would require 2 relays in each door, while the schematic with 2 relays would require them to be in the driver's door only. below are links demonstrating both schematics.
Right click > View image (for full size)
either route will allow the locks to function, it's mainly preference. with the 4 relay schematic, you don't have to mess with the DDM wiring as much as you would have to with the 2 relay schematic.
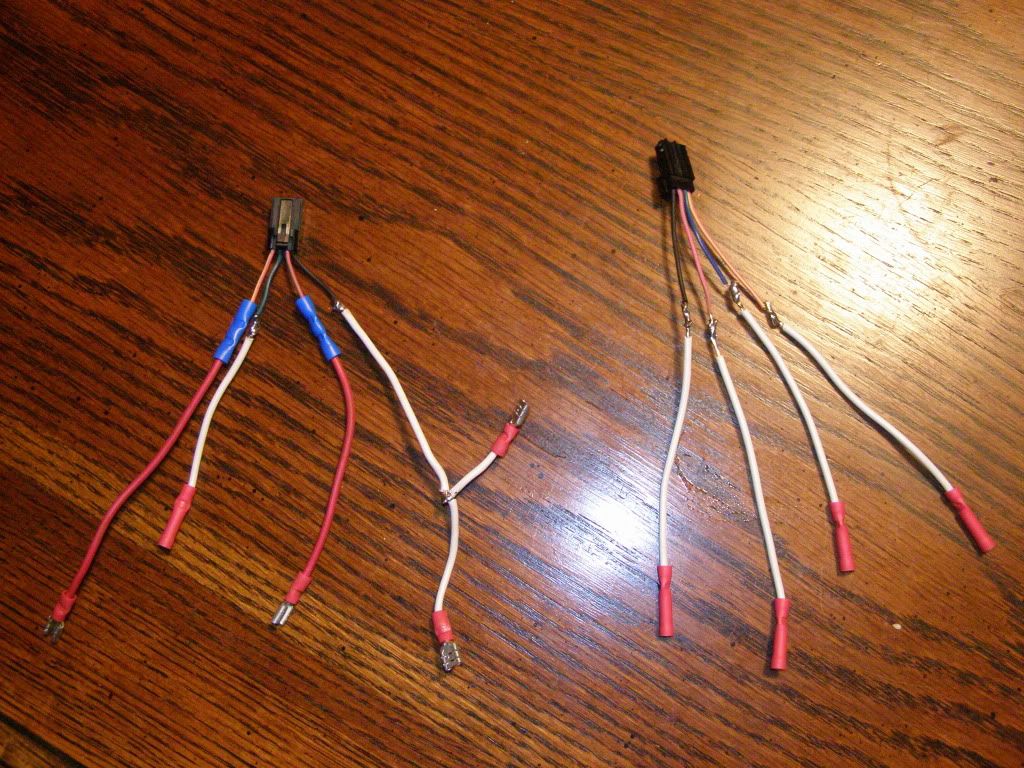
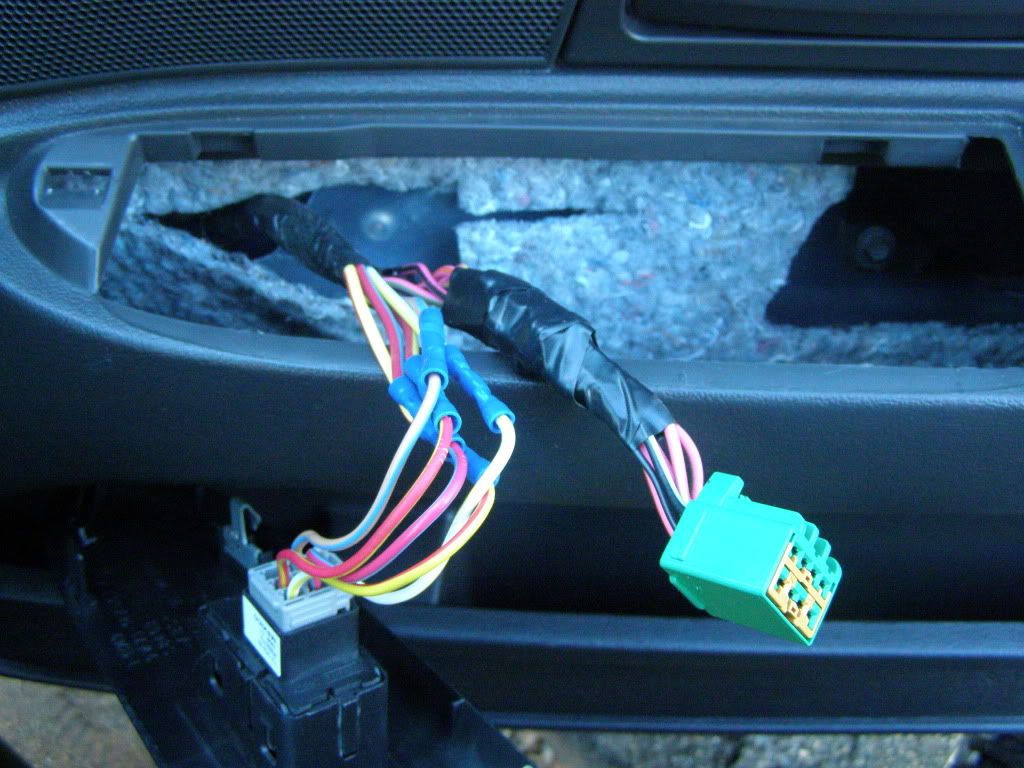
below are some images of getting the 2009+ Lock control pigtails ready for instillation and for the relays. the drivers side pigtail is on the right, passengers on the left. the pigtails i had had barley any wire on them, so i had to extend the wiring (as seen in pictures) notice the passenger's side harness has an additional wire coming from the ground wire. This is so each relay can have a source of ground.
relays hooked up to ground and source and ready to go into passenger's door as seen below. I'm not going to get into what leads go to what position on the relays, that's what the schematics above are for.
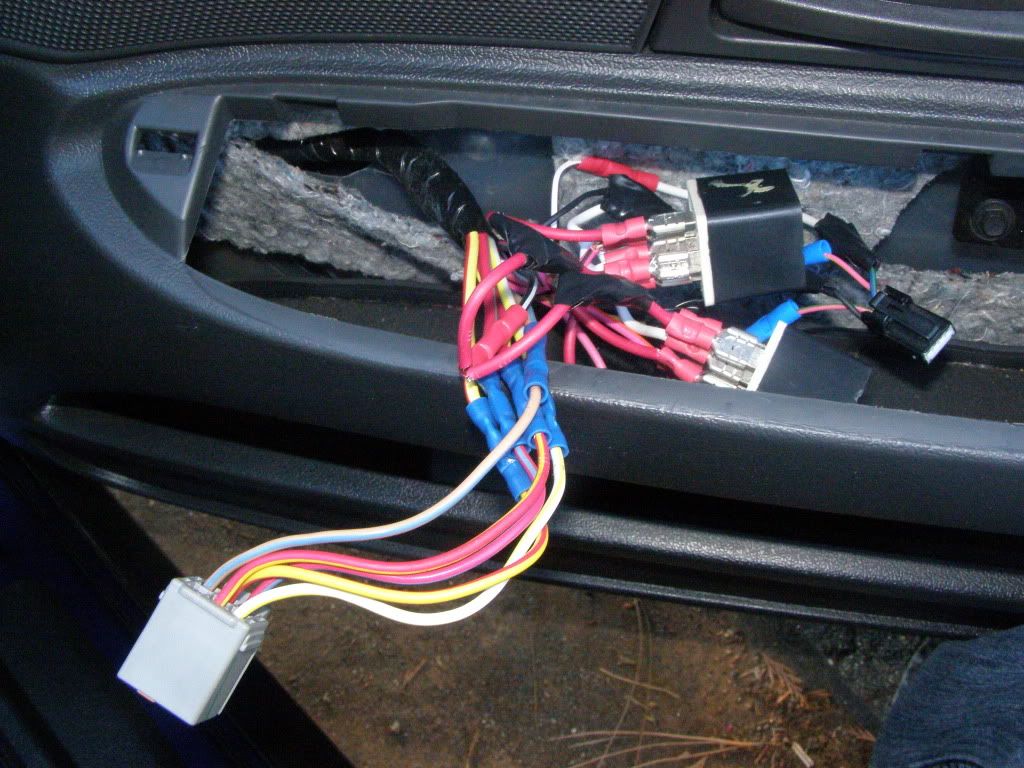
passenger's side pigtail for lock control- hook up the pink/green and the pink/yellow leads from the passenger's door lock harness (car side) in-line with the pink/green and pink/yellow leads on the relay harness respectively. (refer to which lead is what by the color of the wire towards the top of the pic, for reference) The pink/black and pink/orange get wired into the relays. Unless you have a relay pigtail plug, use quick disconnects to make the relay connections.
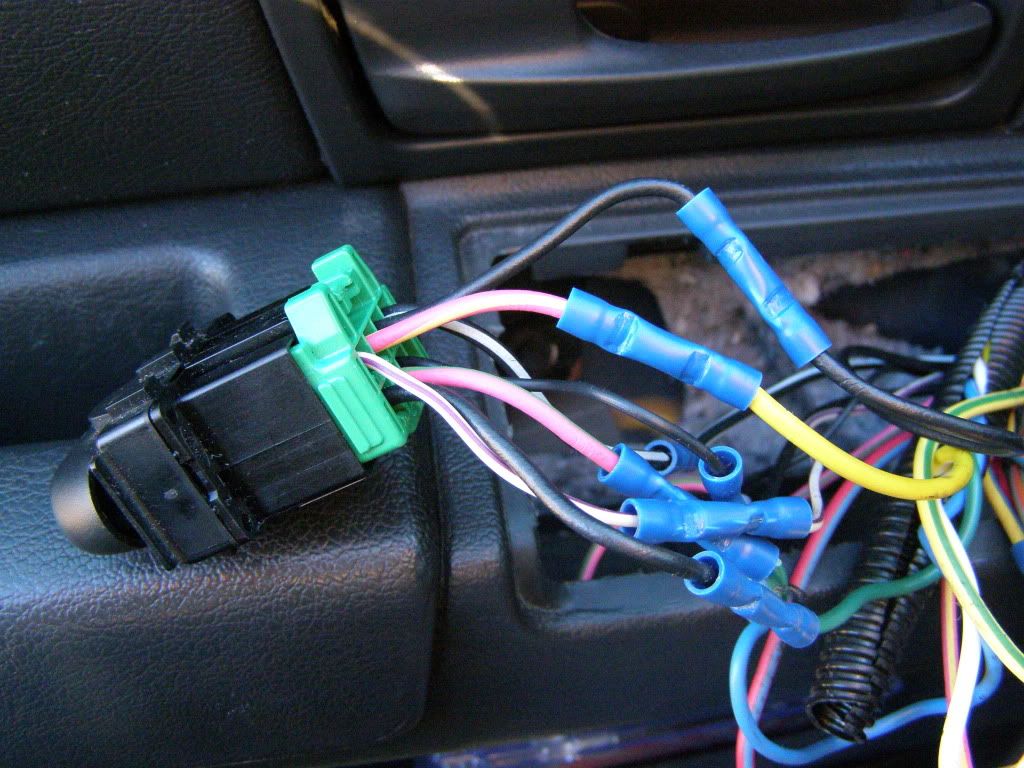
Driver's side pigtail for lock control- Black goes to ground. Pink/green and pink yellow go to the similar colored leads on the lock control on the car's door lock wiring harness. (color match) The dark blue/green lead is for illumination. wire this to the white/violet lead (car side).
Passengers harness before relays are hooked up.
Passengers side after relays were wired in.
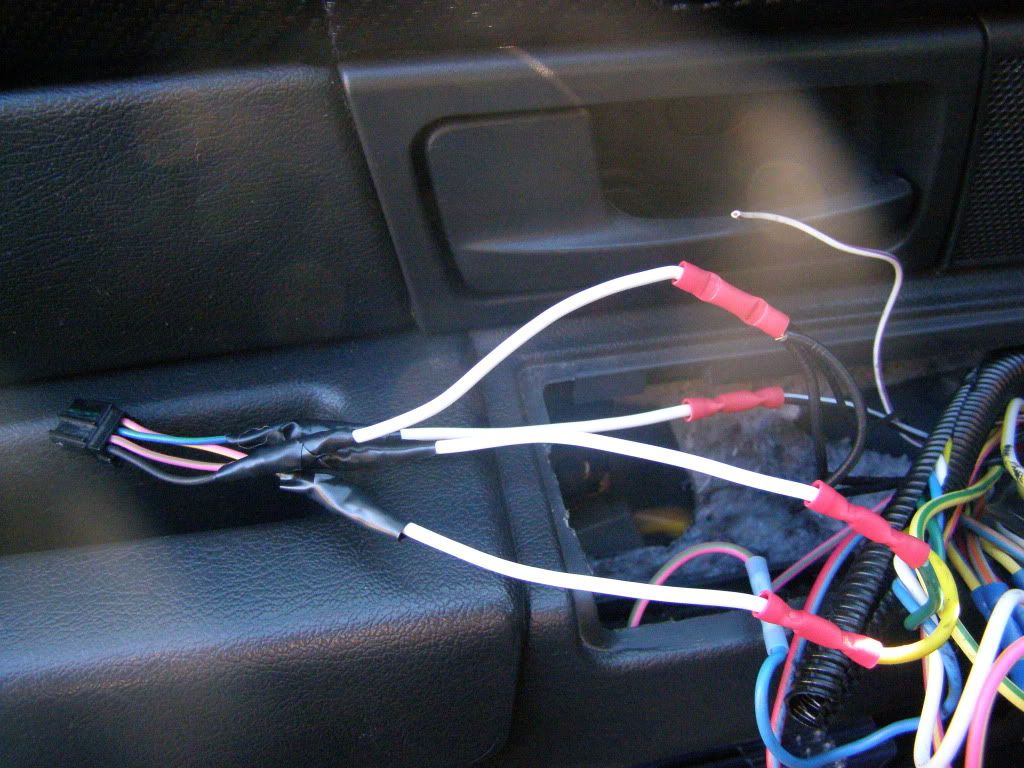
Drivers side before 2009+ lock pigtail was wired in.
Drivers side after 2009+ pigtail was wired in. ( this picture shows illumination going to BLK/WHT- this is WRONG. it needs to go to the white/violet (hot in acc/run) otherwise your locks will be illuminated all the time! (BLK/WHT is hot at all times!)
a few videos i made after everything was wired in and functioning. remember when i said you have to flip the PINK/YELLOW and the PINK/GREEN leads when wiring them into the relays earlier in the guide? i explain why in the second video.
CONTINUED ON SECOND PAGE
_________________________ 2004 Crown Victoria finished in Dark Pearl Blue Metallic (DX) | Ported M122 powered DOHC conversion with all supporting mods. Dyno queen. 2010 BMW M5 V10 finished in Monaco Blue Metallic with 2-tone interior | Eisemann race exhaust | Lowered On Dinan coilovers. Daily Driver
#2625910 - 11/12/1202:24 PMRe: 2009+ window/lock/mirror switch write-up. FULL VER
[Re: Drac]
Drac Cpt. Smug Over the Hill
Registered: 03/19/10
Posts: 3345
Loc: Cali
LAST STEP- MIRROR CONTROLS In this step, we will discuss the necessary steps required to make the power mirrors functional. This step is NOT as easy as just matching wire colors, resulting in a working power mirror.
Wiring colors/leads on the 2003-2008 controller are as follows:
ORANGE/L. GREEN � HOT AT ALL TIMES BLACK- GROUND YELLOW- PIN #2 (common) BOTH L& R MIRRIRS RED- PIN#3; LEFT MIRROR DARK BLUE- PIN #1; LEFT MIRROR DARK GREEN- PIN#3; RIGHT MIRROR VIOLET- PIN #1; RIGHT MIRROR
Using the wiring diagram below (2009+ wiring) you can decipher what colors go where. Below the picture is a cheat sheet for you.
Right click > View image. (for full size)
2009+ wiring schematic and correct transition into 2003-2008 wiring: D. GREEN- HOT AT ALL TIMES. Wire this into the ORANGE/L. GREEN. YE/BLK- PIN #2 (common) BOTH L& R MIRRORS. wire this into YELLOW wire. DG/OG- PIN #3; RIGHT MIRROR. Wire this into the DARK GREEN wire. RED/OG- PIN #3, LEFT MIRROR. Wire this into the RED wire. VIOLET/OG- PIN #1; RIGHT MIRROR. Wire this into the VIOLET wire D. BLUE/OG- PIN #1; LEFT MIRROR. Wire this into the D. BLUE wire. BLACK- GROUND. Wire this to the BLACK wire.
Below are additional pictures you may find helpful.
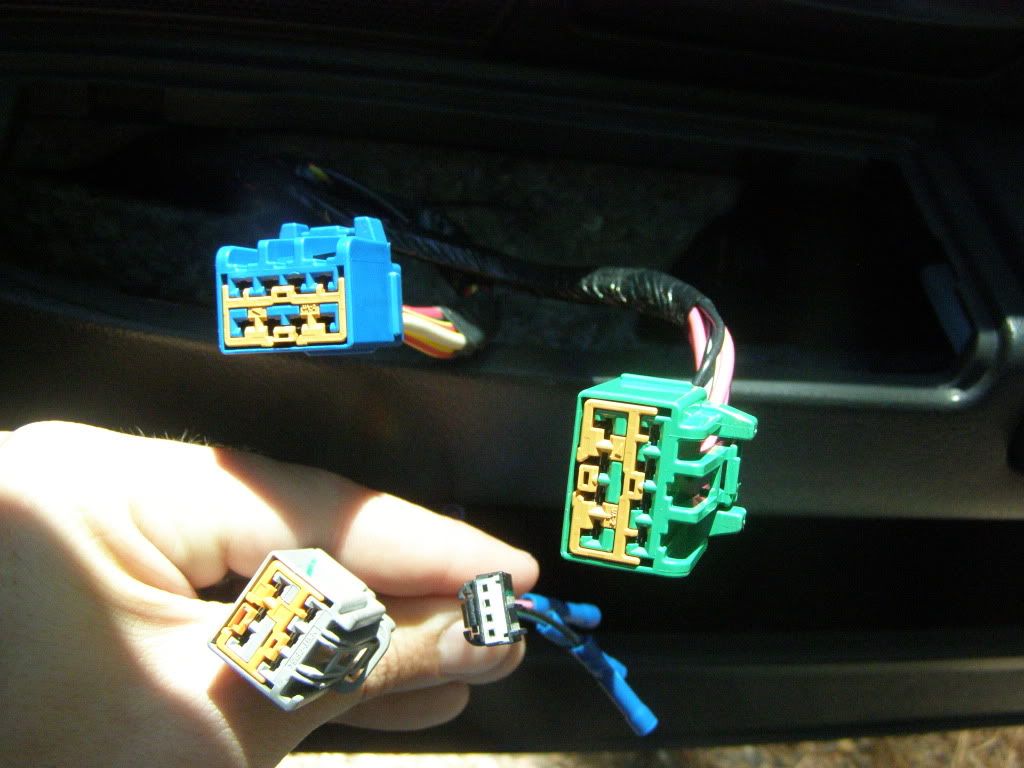
Difference in plug size. (picture is of the passenger's side pigtails) Blue (window control) and green (lock control) plugs are the stock 2003-2008 plugs. Gray is the 2009+ window plug, and the small connector is the 2009+ door lock connector.
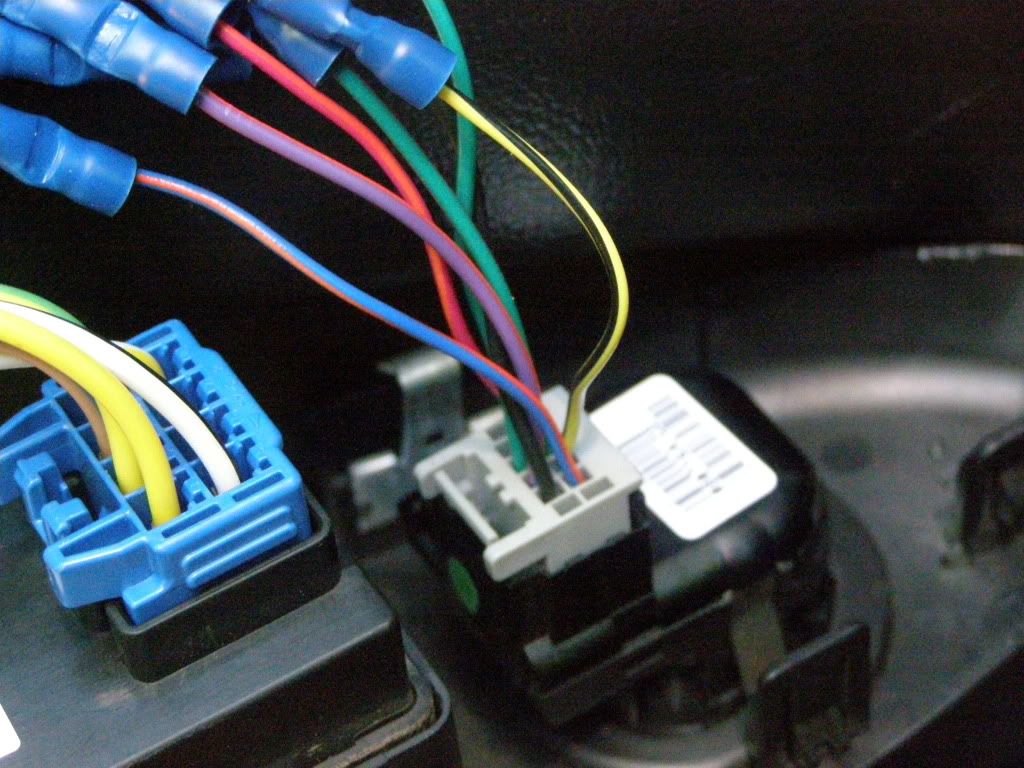
close-up of 2009+ master controls plugged in after instillation. notice the different shape of the mirror plug, along with the difference in size of the lock plug. (last picture; unplugged)
close-up of lock/unlock plug port (2009+)
window control wiring schematics. (2009+)
Right click > View image. (for full size)
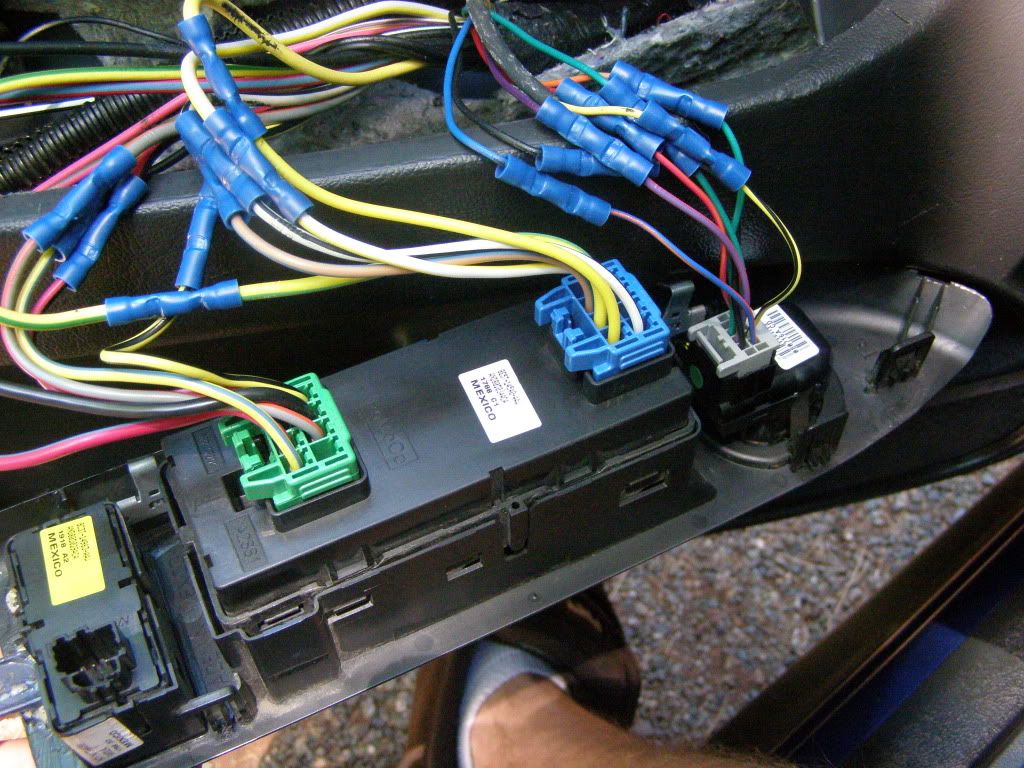
finished installed product.
POST INSTALL THOUGHTS: These are very nice control switches. They have a very clean, updated style and look like they belong. I have noticed that the �window lock� positions are reversed. Not much of an issue, as it is pretty easy to adapt to. If anyone has any questions regarding this guide, please post or PM me!
Enjoy!
-Drac
_________________________ 2004 Crown Victoria finished in Dark Pearl Blue Metallic (DX) | Ported M122 powered DOHC conversion with all supporting mods. Dyno queen. 2010 BMW M5 V10 finished in Monaco Blue Metallic with 2-tone interior | Eisemann race exhaust | Lowered On Dinan coilovers. Daily Driver
Copyright 2000-2015 by Crownvic.net and Steve Spaulding. All Rights Reserved.
The photographs, graphics and data contained in this Web site are the properties of the contributors, or Crownvic.net and may not be used without expressed written consent. Crownvic.net is not affiliated with the Ford motor company.


 Previous Topic
 Index
Index
 Your Privacy Choices